Inventory management built for Australian wrecking yards — from acquisition and dismantling through to sales, dispatch and the books.
Welcome to WreckMate
WreckMate is an inventory management system built specifically for Australian wrecking yards. It replaces the old way of doing things — spreadsheets, whiteboards, and expensive desktop software — with a modern, mobile-friendly platform that runs in your browser on any device.
Whether you're on the yard floor grading parts off a donor or at home checking your stock levels, WreckMate works the same way everywhere.
Who is WreckMate for?
- Wrecking yard owners and managers who want a clear picture of their stock, sales, and margins
- Sales staff who take phone and counter enquiries and need to find parts fast
- Dismantlers who pull and catalogue parts from donor vehicles
- Dispatch staff who pick, pack and ship orders
- Accountants and bookkeepers who need GST-compliant invoices, statements and accounting software integration
If your yard is currently using Hollander (Pinnacle Professional by Solera), spreadsheets, or pen-and-paper, WreckMate is a direct upgrade — and there's a guided migration path for Pinnacle data.
How the app is organised
WreckMate's left-hand menu follows the life of a vehicle through your yard, and this help centre is organised the same way:
Record every vehicle purchase — price, source, seller — so margins are tracked from day one.
Dismantling cards, per-part grading, depollution and Certificates of Destruction, plus donors, parts and shelf stock.
Quotes, counter sales, customers, GST invoices and eBay listings.
Search your stock, the network, and WreckIntel fitment data in one place.
Work orders, pick/pack/dispatch, purchase orders and inter-yard orders.
Daily reconciliation, receivables and statements, returns and warranty, and reports.
What WreckMate includes
Core — day-to-day yard operations
- Acquisitions — record vehicle purchases with full cost breakdowns
- Inventory management — register donor vehicles, track dismantling, manage parts with SKU labels
- Shelf stock — new and aftermarket lines sold by quantity, with reorder points
- Parts search — search your stock by vehicle, part name, SKU, or OEM number in seconds
- Quotes and sales — quotes, counter sales, and GST-compliant tax invoices
- Customer management — customer history, trade accounts, credit limits and statements
- SMS notifications — text customers quotes, invoices and shipping updates via your own Twilio account
- Inter-yard network — search other WreckMate yards for parts you don't have, place orders, and message them directly
- Fitment lookup — WreckIntel compatibility data built on Australian vehicles
- Dispatch — basic dispatch for every yard; the full pick/QA/pack work-order pipeline on Pro
- Staff management — role-based access so each person sees what they need
- Reports — sales, stock, ageing, statutory registers and more
- Data import — bring your existing inventory across via CSV or the Pinnacle migration tool
Pro — the full feature set
Everything in Core, plus:
- eBay Integration — list parts on eBay Motors AU, sync sales, end listings automatically when sold
- MYOB and Xero Integration — push invoices and sales to your accounting software
- Work Order Manager — the full pick → QA → pack → dispatch → deliver pipeline with couriers, routes and manifests
- Advanced reporting — yield, margin, profitability and demand intelligence
- Website widget — show your live stock on your own website
Pricing
| Plan | Monthly cost (inc GST) |
|---|---|
| Core — day-to-day yard operations | $999/month |
| Pro — full feature set | $1,499/month |
All prices are in Australian dollars and include GST — the figure above is what you pay, with nothing added at checkout.
Your first 60 days are free with full Pro-equivalent access — no credit card required. Multi-yard groups and referrals attract discounts; see Settings → Account → Billing in the app for your plan, your referral code, and current offers.
Coming from Hollander/Pinnacle? Ask us about the migration tool — it brings your existing vehicle and parts data across, preserving your stock history. See Data Import.
Getting started
The fastest way to get up and running is the Quick Start guide — five steps and your yard is operational.
Inside the app, the built-in onboarding tour walks you around the interface the first time you sign in. You can re-run it any time from the Help (?) menu in the top-right corner — choose Training walkthrough.
Need help at any point? Open the Help (?) menu in the app's header for this help guide, keyboard shortcuts, and feature requests — or contact support@wreckmate.com.au.
Get your yard running in WreckMate in about 20 minutes. Five steps, and you're live.
Quick Start
This guide walks you through the five essential steps to get your yard operational in WreckMate. By the end, you'll have your yard profile set up, your team invited, a donor vehicle registered, parts searchable, and your first quote created.
The built-in onboarding tour walks you around the same ground interactively the first time you sign in. You can restart it any time from the Help (?) menu in the top-right corner — choose Training walkthrough.
Step 1: Set up your yard profile
Before anything else, tell WreckMate about your yard.
Open Settings
Click Settings at the bottom of the left-hand menu. You'll land on Profile → Yard Profile.
Fill in your yard details
Enter:
- Yard name — the name you trade under (e.g. "Brisbane Auto Parts")
- Yard code — a short code used in your part SKUs (e.g. "BNEAP"). This cannot be changed after creation.
- ABN — your Australian Business Number. This appears on invoices.
- Address, phone and email — used on invoices and customer communications
- Customer contact email — where customer replies to your quotes and invoices go (optional; falls back to your main email)
Save your profile
Click Save. Your yard is registered and your SKU prefix is locked in.
Choose your Yard Code carefully — it becomes the prefix on every SKU you print (e.g. BNEAP-TOY-2019-00001). It cannot be changed after creation.
Step 2: Invite your team
Add staff so they can log in and start working.
Go to Settings → Team
In Settings, choose Team in the category rail, then Staff Management.
Add a team member
Click Add user, enter their email address, and select their role:
| Role | Best for | |------|----------| | Sales rep | Counter sales, quotes, customer enquiries | | Dispatch | Picking, packing and shipping orders | | Accountant | Invoicing, reports, accounting sync | | General Manager | Oversight and staff management | | Administrator | Full access except billing | | Business Owner | Full access including billing and role changes | | Hybrid | A mix — fine-tune what they can see under Team → Permissions |
They get an email invite
The staff member receives an email with a link to set up their account. They'll have access as soon as they've signed up.
Only a Business Owner can assign the Business Owner role, and nobody can change their own role — so you can't lock yourself out by accident.
Step 3: Record an acquisition, then register the donor
A donor vehicle is any wrecked, written-off, or end-of-life vehicle you've purchased for dismantling. In WreckMate the money comes first: you record the acquisition (what you paid), then register the vehicle against it.
Record the acquisition
Go to Acquisitions in the left menu and click New Acquisition. Enter the source (auction house, private purchase, insurance…), the purchase price and any extra costs (buyer's premium, towing), the condition at purchase, and the seller. See Acquisitions for the full walkthrough.
Register the donor vehicle
Go to Inventory and click Add next to Donor Vehicles. The Register Donor Vehicle wizard opens:
- Step 1 — Acquisition: link the acquisition you just saved (or create one on the spot).
- Step 2 — Vehicle: enter the VIN (optional), registration plate (optional), make, model, year and body style. The body style pre-loads the right dismantling checklist for the vehicle.
The dismantling card is created automatically
When you save, WreckMate creates a Dismantling Card for the vehicle and takes you straight to it — your dismantlers can start grading and pricing parts immediately.
Example: a 2019 Toyota HiLux bought at auction for $4,200 plus $150 towing. Record the acquisition ($4,350 total cost), register the vehicle against it, and the Ute checklist appears ready to tick off — with the vehicle's profit and loss tracked against that $4,350 from the first part sold.
Step 4: Search for a part
Try a parts search to see how it works before you have a lot of stock in the system.
Go to Parts Search
Click Parts Search in the left menu.
Search by part, vehicle, or both
Type a part name, SKU or OEM number — or pick a make, model and year from the filter chips — and hit Search.
Read the results
Results are grouped into:
- Shelf stock — your new & aftermarket lines that match
- Your stock — dismantled parts in your inventory
- Network — matching parts at other WreckMate yards, with Enquire / Quote / Order actions
See Parts Search for filters, fitment matching and the VIN lookup.
Step 5: Create your first quote
Quotes are the heart of WreckMate sales — every sale starts as a quote.
Go to Quotes & Sales
Click Quotes & Sales in the left menu, then New Quote.
Add a customer and parts
Search for the customer (or create one on the spot — a name is enough to start), then search your stock in the Add Item box and click parts to add them.
Send it, or sell on the spot
- Send emails the customer a PDF — optionally with a secure link they can use to accept or decline the quote themselves.
- Sell (Counter) converts it straight to a completed sale with a GST tax invoice.
You're up and running
Once you've completed these five steps, the rest of WreckMate builds on this foundation:
The setup checklist that appears when you first log in, and the training walkthrough you can re-run any time.
Onboarding & Training
WreckMate gives you two helpers when you're new:
- The Onboarding Wizard — a setup checklist that appears when you first log in and tracks your progress through the essential setup steps.
- The Training walkthrough — a guided tour of the interface that highlights each part of the screen in turn. It runs automatically on your first visit, and you can re-run it any time from the Help (?) menu in the top-right corner of the app.
The first two setup steps (yard profile and team) matter most. The rest can be skipped and completed later — the wizard saves your progress automatically.
The onboarding steps
Step 1 — Set up your yard profile
This is the most important step. You need to enter your:
- Yard name and yard code (the code prefix used in your SKUs — e.g.
SYDWR) - ABN — used on every GST invoice you generate
- Address and contact details — these appear on invoices and customer communications
Why it matters: without your yard code, WreckMate can't generate SKUs for your parts. Without your ABN, your invoices won't be tax-compliant.
To complete: go to Settings → Profile → Yard Profile, fill in the fields, and click Save.
Step 2 — Invite your first team member
Add at least one other person to your WreckMate account — a salesperson, a dismantler, or a business partner.
To complete: go to Settings → Team → Staff Management, click Add user, enter their email address, and select a role. If you're running the yard alone, skip this step and come back to it later.
Step 3 — Register your first donor vehicle
Add a wrecked or end-of-life vehicle to your inventory. Donors are the source of every part you sell, and registering one triggers the dismantling card and links acquisition costs to your parts automatically.
To complete:
- Record the purchase under Acquisitions → New Acquisition
- Go to Inventory and click Add next to Donor Vehicles
- Link the acquisition, then enter the vehicle details (make, model, year, body style — VIN optional)
- Save — the dismantling card opens, ready to use
Don't worry about entering every detail perfectly first time. You can edit donor records later.
Step 4 — Do your first parts search
Run a search in Parts Search to see how your sales staff will answer customer enquiries. Type a part name or pick a make and model, hit Search, and look at the three result groups: shelf stock, your stock, and the network.
Step 5 — Create your first quote
Go to Quotes & Sales → New Quote, add a customer and at least one part, and save. You don't need to complete the sale — this step is about seeing the quote-to-sale flow before your first real customer.
Bringing your existing data across
If you're moving from another system, do the data import early — it's much easier to learn WreckMate with your real stock in it. See Data Import for the CSV format and the Pinnacle (Hollander) migration path.
If the wizard doesn't appear
It may have already been completed by another user in your yard — the checklist is per-yard, not per-person. You can still re-run the Training walkthrough from the Help (?) menu whenever you like, and this help centre covers everything the wizard does in more depth.
Your morning overview — live widgets you can resize and rearrange, global search, and the header tools.
Dashboard & Widgets
The Dashboard is the first screen you see when you log in. It greets you with the day's headline numbers — parts in stock, active quotes, and anything needing attention — and below that, a grid of live widgets you can arrange to suit how you run your yard.
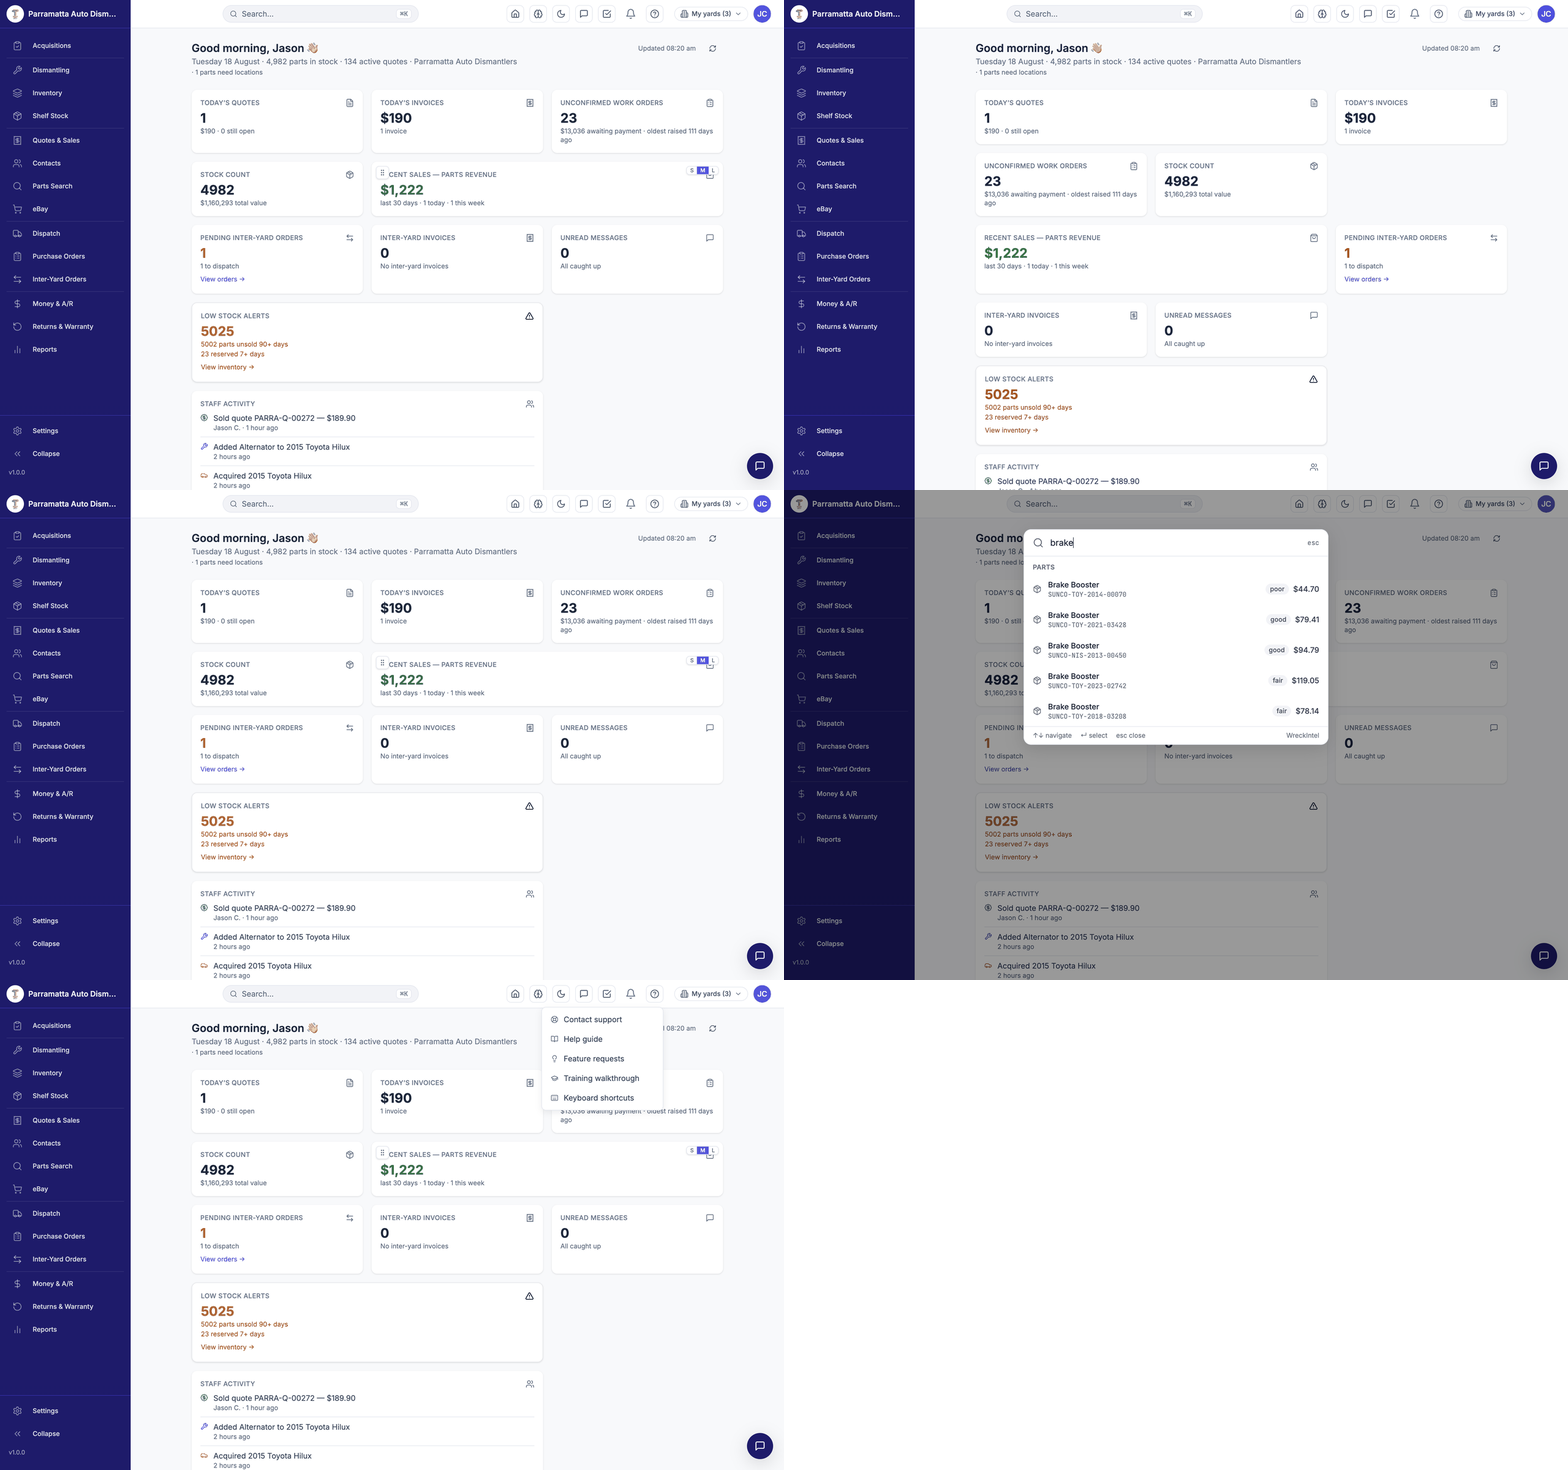 Walkthrough: the dashboard overview, choosing which widgets appear from Your Profile, more widgets further down the page, the ⌘K global search, and the Help menu.
The header strip
Across the top of the dashboard you'll see a greeting with today's date and your yard's key numbers at a glance — total parts in stock, active quotes, and alerts such as parts that still need a bin location. The Updated timestamp shows when the numbers were last refreshed; click Refresh to update them on the spot.
Widgets
Each widget is a live tile fed by your yard's data:
| Widget | What it shows |
|---|---|
| Today's Quotes | Quotes written today |
| Today's Invoices | Invoiced value and count for today |
| Unconfirmed Work Orders | Sales raised but not yet confirmed/paid, with the value awaiting payment and the oldest outstanding |
| Stock Count | Parts on hand and their total value |
| Recent Sales — Parts Revenue | Rolling 30-day revenue, with today and this week called out |
| Pending Inter-Yard Orders | Network orders awaiting action, with a link straight to the orders page |
| Inter-Yard Invoices | Outstanding trade invoices between yards |
| Unread Messages | Direct messages waiting for you |
| Low Stock Alerts | Slow-moving stock (unsold 90+ days) and long-held reservations |
| Staff Activity | A feed of recent actions by your team — sales, quotes, and more |
Arranging your dashboard
Until you pick your own widgets, the dashboard shows the standard set for your role. To build your own, go to Your Profile → Dashboard widgets and tick the ones you want; your picks replace the standard set, and they are saved per yard.
Once you have chosen your widgets, each one gains its own controls:
- Resize — every widget has S / M / L buttons in its corner: Small (one column), Medium (two columns), or Large (full width).
- Reorder — use the drag handle (the dotted grip icon) to drag widgets into the order you want.
Your layout is saved automatically and remembered next time you log in.
Put the widgets you check every morning — Today's Invoices, Unconfirmed Work Orders, Low Stock Alerts — at the top in Medium or Large, and shrink the rest.
Global search (⌘K)
The Search box in the header — or the keyboard shortcut ⌘K (Ctrl+K on Windows) — opens the global search palette from anywhere in the app. Start typing and it searches parts, vehicles, customers and orders as you type, showing SKUs, conditions and prices right in the results. Press Esc to close it.
This is the fastest way to jump to a part when a customer is on the phone reading you a SKU.
Header tools
To the right of the search box:
- Light/dark mode — switch the whole app's theme.
- Direct messages — chat with other yards on the network.
- Tasks and Notifications — your to-dos and alerts.
- Help (?) — opens the help menu: Help guide (this site), Feature requests, Training walkthrough (re-runs the guided tour), and Keyboard shortcuts.
- My yards — if you belong to more than one yard, switch between them here. Every screen then shows the selected yard's data.
- Account menu — your profile and sign out.
If you belong to several yards, check the yard name in the top-left corner before entering data — everything you create lands in the currently selected yard.
Recording every vehicle purchase — price paid, source, seller and costs — so margin and recovery reporting works from day one.
Acquisitions
An acquisition record captures how you purchased a vehicle — the price you paid, where you bought it, who sold it to you, and any extra costs like towing. It is the cost basis for everything that follows: every part sold from that vehicle is measured against its acquisition cost in your Vehicle P&L and margin reports.
Acquisitions live under ACQUIRE → Acquisitions in the left menu.
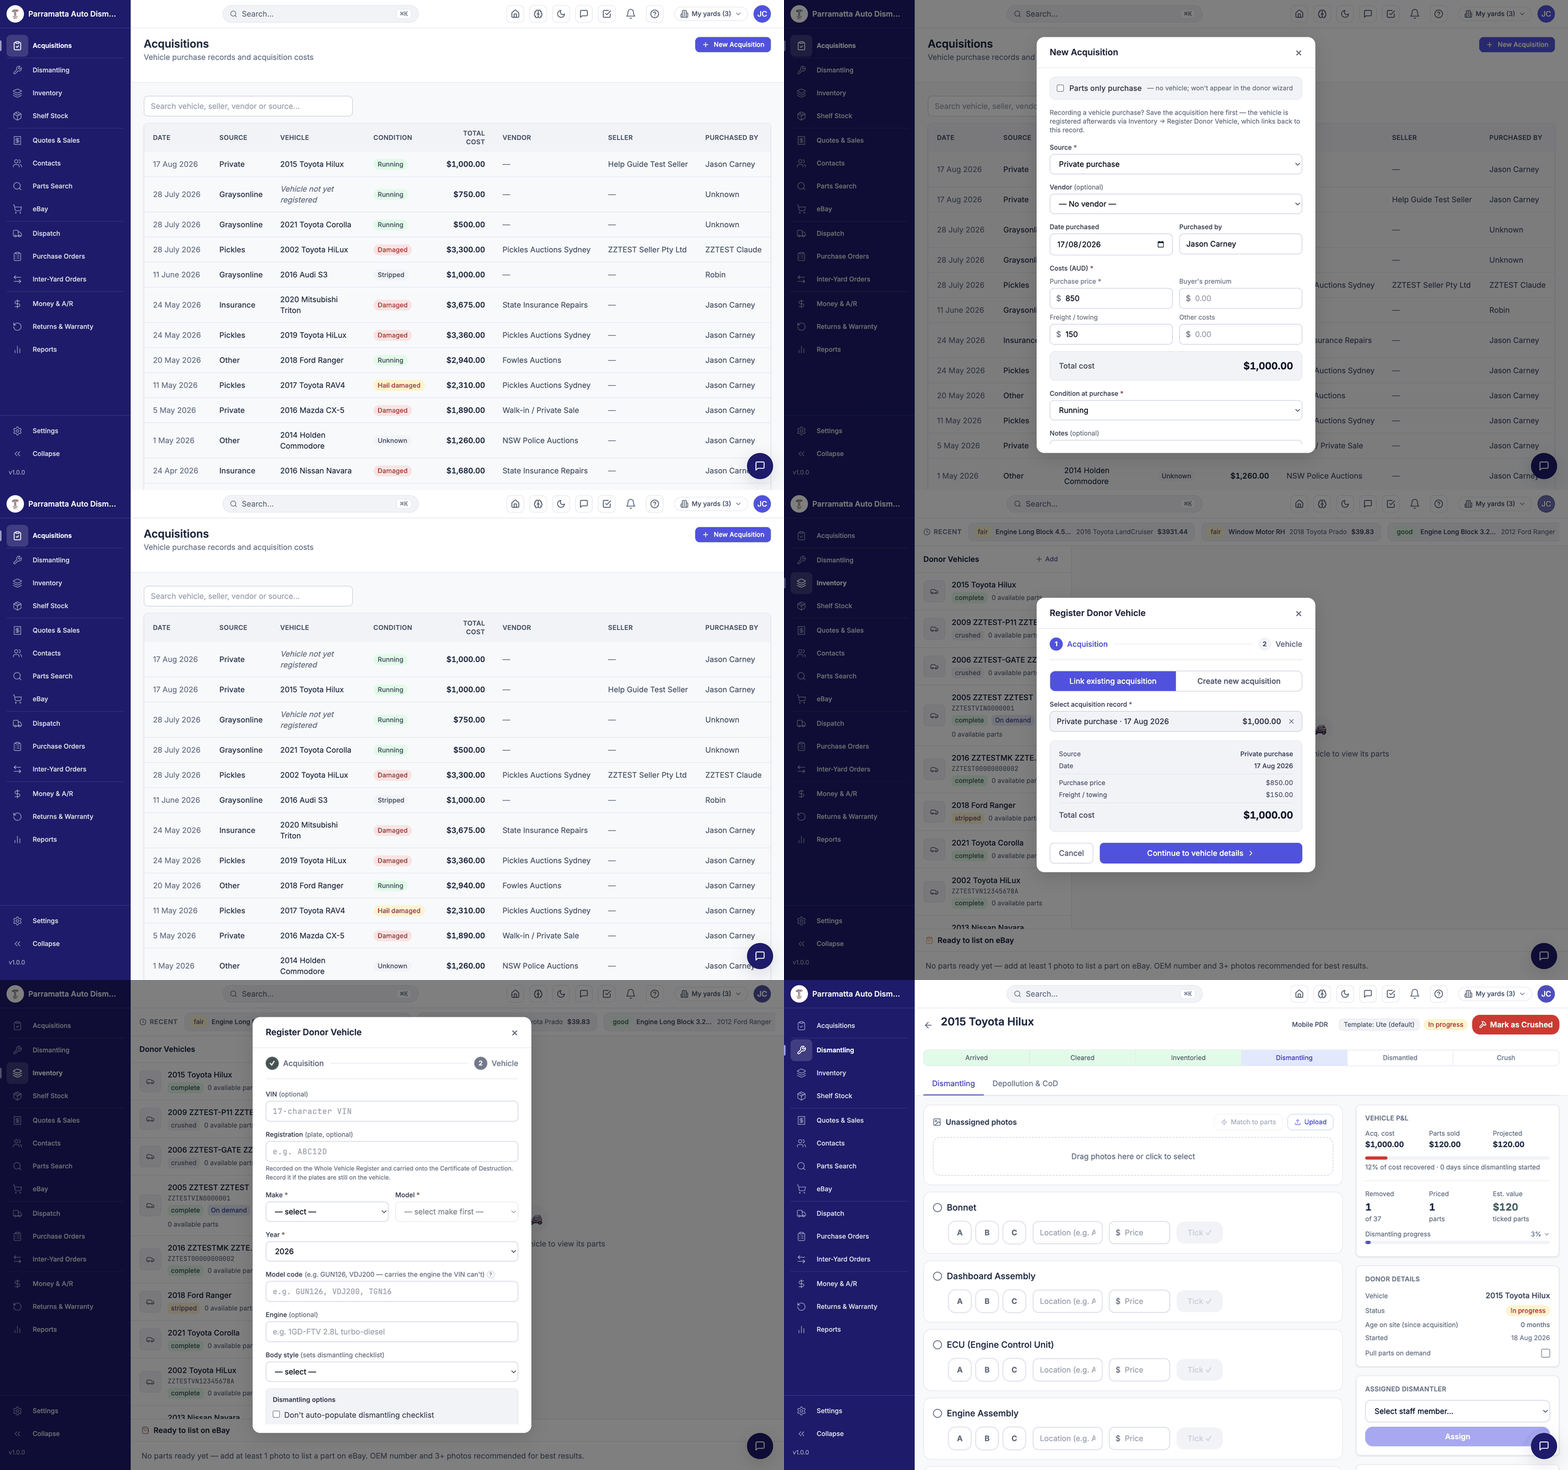 Walkthrough: recording a private-purchase acquisition, then registering the donor vehicle that links back to it.
How acquisitions and donor vehicles fit together
WreckMate records the purchase and the vehicle as two linked steps:
- Save the acquisition first on the Acquisitions page — this records the money side.
- Register the vehicle afterwards via Inventory → Donor Vehicles → Add. Step 1 of that wizard asks which acquisition the vehicle belongs to and links the two.
Until a vehicle is registered against it, an acquisition shows "Vehicle not yet registered" in the list. That's normal — it just means step 2 hasn't happened yet.
Buying a box of loose parts rather than a whole car? Tick Parts only purchase on the acquisition form. The record keeps your costs honest but won't appear in the donor-vehicle wizard.
Recording a new acquisition
Open the form
Go to Acquisitions and click New Acquisition.
Choose the source
Where you bought the vehicle: Graysonline Auctions, Pickles Auctions, Insurance write-off, Private purchase, Trade-in, or Other. Your own custom sources (added under Settings → Yard Profile → Acquisition options) appear here too.
Pick a vendor (optional)
If the purchase came through a business you deal with regularly — an auction house, an insurer — select them from your vendor list. Vendors are managed on the Contacts → Vendors tab.
Enter date and purchaser
Date purchased defaults to today. Purchased by records which of your staff made the buy — useful later when you're reviewing which buyer's picks perform best.
Enter the costs
All amounts are in AUD:
| Field | What to enter | |-------|--------------| | Purchase price (required) | The hammer price or agreed price | | Buyer's premium | Auction premium, if any | | Freight / towing | What it cost to get the vehicle to your yard | | Other costs | Anything else — cleanup, keys, paperwork |
The Total cost is calculated automatically and becomes the vehicle's cost basis.
Set the condition at purchase
Running, Damaged, Fire damaged, Hail damaged, Flood damaged, Stripped or Unknown. This records what you bought — it doesn't affect individual part grades later.
Record the seller
Start typing in the seller field. Pick an existing seller or just keep typing a new name — WreckMate creates the seller record inline, with optional phone, ABN and address fields underneath.
Sellers are not customers. The people you buy vehicles from are kept in their own list, separate from the people you sell parts to.
Save
Click Save Acquisition. The record appears at the top of the list, showing date, source, vehicle (once registered), condition, total cost, vendor, seller and purchaser.
Why the detail matters
Every dismantling card shows acquisition cost against parts sold and projected value — the recovery percentage starts from the number you enter here.
Over months, reports show which sources and buyers give you the best return, so your next auction budget goes where the margin is.
Don't skip freight and premium costs. A $250 tow on every second vehicle is thousands of dollars a year of understated cost — and every margin figure downstream inherits the gap.
Working a dismantling card — grading and pricing parts, tracking Vehicle P&L, depollution, and the crush lifecycle.
Dismantling
A dismantling card is the digital work order for a donor vehicle. It lists the parts worth pulling for that body style, records each part's grade, location and price as it comes off, tracks depollution of hazardous materials, and follows the vehicle all the way to crushing.
Cards are created automatically when a donor vehicle is registered — you never create one by hand. Find them under DISMANTLE → Dismantling.
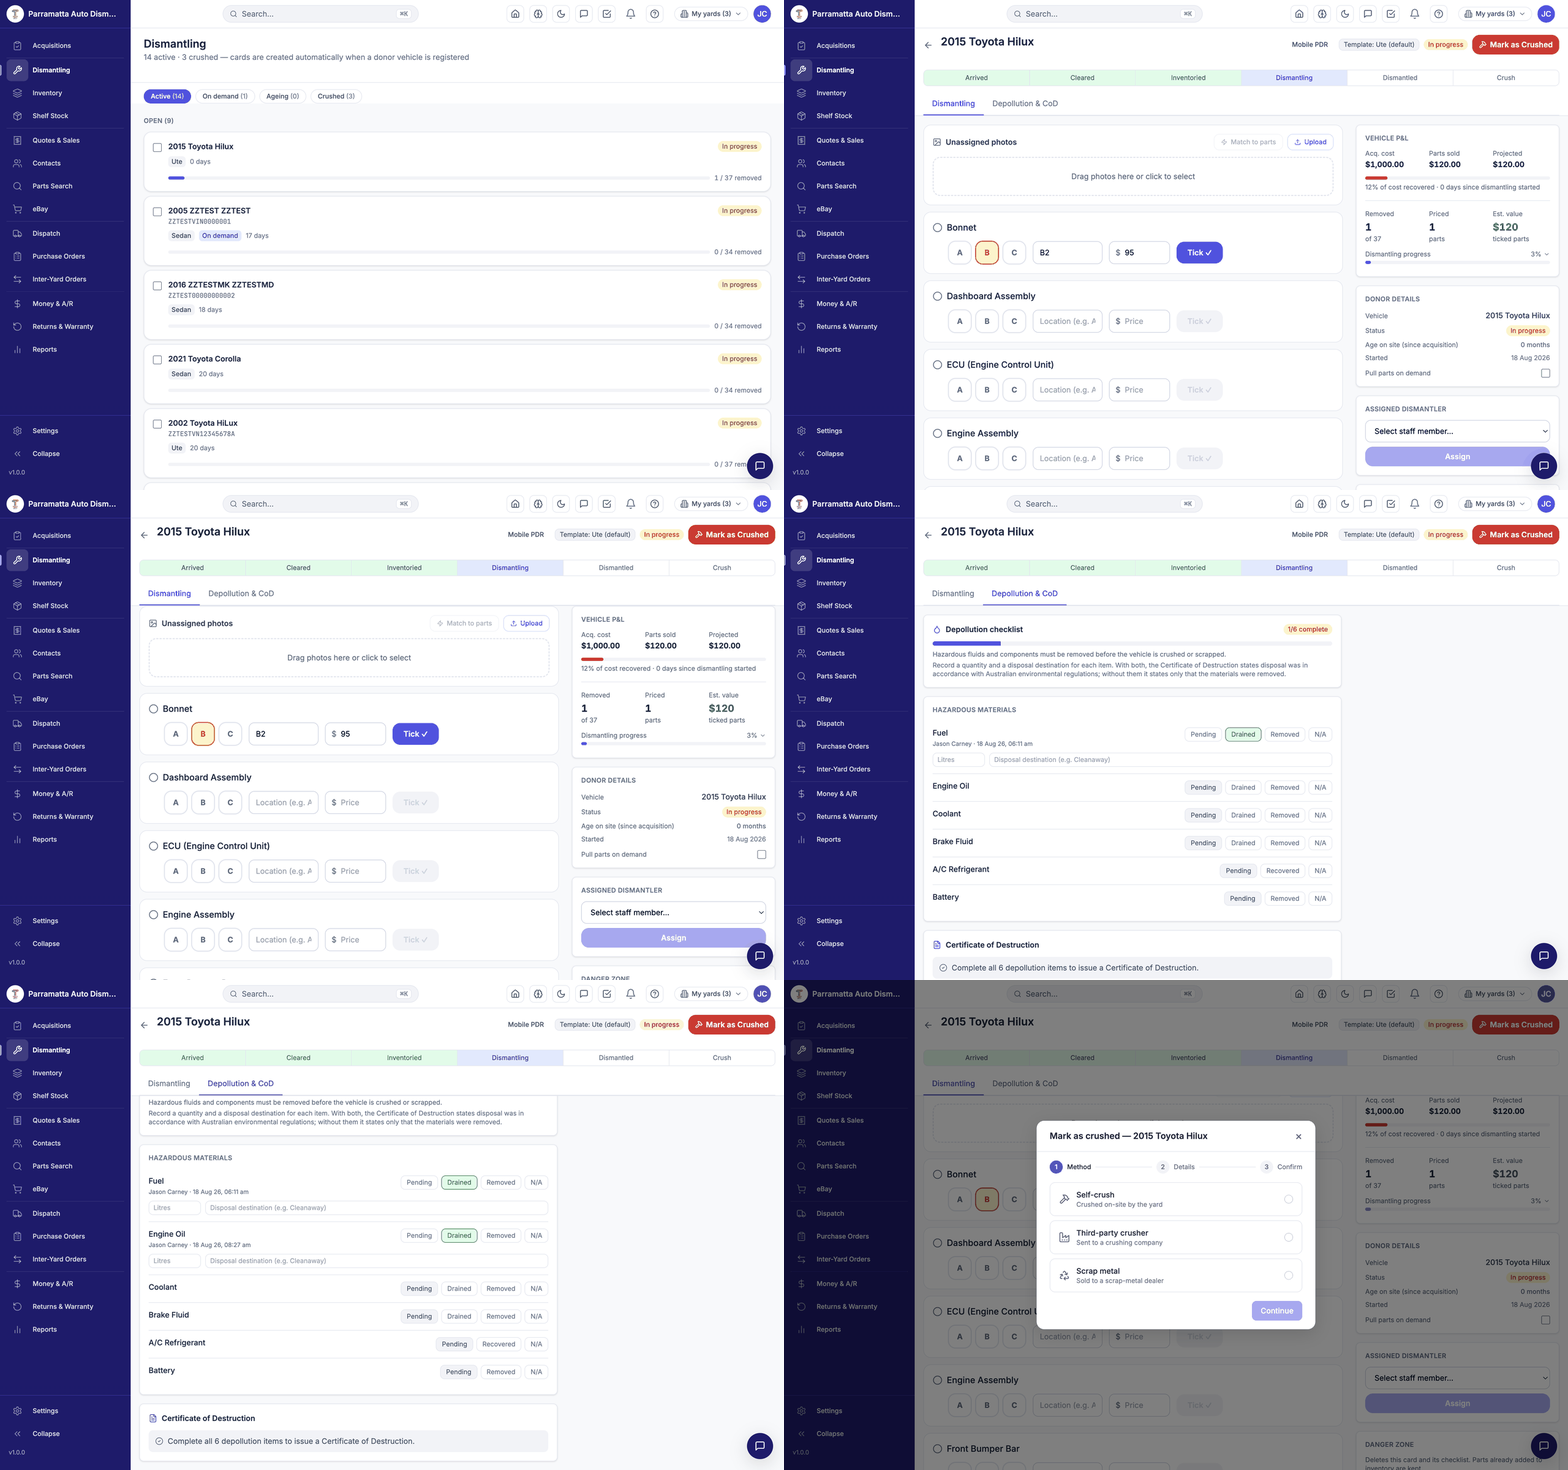 Walkthrough: opening a card, grading and ticking a part, the Vehicle P&L panel, the depollution checklist, and the crush wizard.
The cards list
The Dismantling page groups cards into tabs:
| Tab | What's in it |
|---|---|
| Active | Cards currently being worked, grouped by status |
| On demand | Vehicles stored whole under Pull parts on demand |
| Ageing | Cards that have been open a long time |
| Crushed | Vehicles that have completed the lifecycle |
Each card tile shows the vehicle, its template body style, days open, and removal progress (e.g. 12 / 37 removed).
The vehicle lifecycle
Across the top of every card is the lifecycle strip:
Arrived → Cleared → Inventoried → Dismantling → Dismantled → CrushThe strip reflects the card's progress automatically — Dismantling is highlighted while the card is open, Dismantled once the card is complete, and Crush after the vehicle is crushed. You drive it by doing the work, not by clicking the stages.
Grading and ticking parts
The heart of the card is the parts checklist, pre-filled from the vehicle's body-style template (a Ute gets a ute checklist, a Sedan a sedan one — see the donor wizard). For each part:
Grade it
Click A, B or C:
- A — clean, undamaged, fully functional
- B — minor wear or cosmetic marks, fully functional
- C — significant damage; still sellable with disclosure
Give it a bin location
Type where it's going on the shelf — e.g. A3. The location prints on labels and shows in search results, so the counter can find it in seconds.
Price it
Enter the selling price (GST-inclusive). Tick ✓ stays disabled until the part has both a grade and a price — that gate is deliberate, so nothing enters stock half-described.
Tick it off
Click Tick ✓. The part is created in your inventory immediately — SKU assigned automatically, visible in Parts Search — and the row moves into Show completed. The card's removed/priced counters and estimated value update as you go.
Found something the template didn't suggest? Use Add at the bottom of the checklist.
Never grade up to sell faster. A misgraded part comes back as a warranty claim with your name on the card — the tick records who graded it and when.
Photos
The Unassigned photos area accepts drag-and-drop uploads; use Match to parts to attach them to the right parts afterwards. Photos matter beyond the listing — a part needs at least one to be eligible for eBay.
Vehicle P&L
The VEHICLE P&L panel answers "was this car worth buying?" live:
- Acq. cost — from the acquisition record
- Parts sold — actual revenue from this donor so far
- Projected — what the priced parts would bring if they all sold
- % of cost recovered and days since dismantling started
- Removed / Priced / Est. value counters and a progress percentage
Recovery over 100% means the vehicle has paid for itself — everything else it sells is gross profit.
The DONOR DETAILS panel beside it shows the vehicle, status, age on site and the Pull parts on demand toggle; ASSIGNED DISMANTLER lets you put a staff member's name on the job.
Pull parts on demand
For rural or low-throughput yards, Pull parts on demand stores the vehicle whole instead of pre-dismantling it. Its parts appear in network search as "Available on request", and you pull them only when an order actually lands. Turn it on at registration or from the card's donor-details panel; on-demand cards sit in their own tab.
Depollution & Certificate of Destruction
The Depollution & CoD tab tracks the six hazardous-material items that must be dealt with before a vehicle is crushed or scrapped:
| Item | Actions available |
|---|---|
| Fuel | Pending / Drained / Removed / N/A |
| Engine oil | Pending / Drained / Removed / N/A |
| Coolant | Pending / Drained / Removed / N/A |
| Brake fluid | Pending / Drained / Removed / N/A |
| A/C refrigerant | Pending / Recovered / N/A |
| Battery | Pending / Removed / N/A |
Each mark is stamped with who did it and when.
Refrigerant is recovery-only. The checklist will not let you mark A/C gas as "drained" — it must be professionally recovered, and the options reflect that per-item.
Record a quantity and disposal destination for each item. With both recorded, the Certificate of Destruction states the materials were disposed of in accordance with Australian environmental regulations; without them it can only state that they were removed.
All six items must be complete before a Certificate of Destruction can be issued from the panel below the checklist.
Crushing the vehicle
When the shell is done, click Mark as Crushed. A three-step wizard walks you through it:
- Method — Self-crush (on site), Third-party crusher, or Scrap metal (sold to a dealer)
- Details — who, when, and reference details for the method chosen
- Confirm
Crushing completes the lifecycle strip and moves the card to the Crushed tab. Crush records feed the Crush Records report, and the crush flow is the only thing that records a vehicle's destruction — issuing a CoD alone does not.
Browsing your donors on the Inventory page and registering a new vehicle with the two-step wizard.
Donor Vehicles
A donor vehicle is any end-of-life or salvage vehicle you've bought for dismantling. Every dismantled part traces back to one. Donors live on the Inventory page (under DISMANTLE in the left menu), alongside a Recently viewed strip of parts you've had open lately.
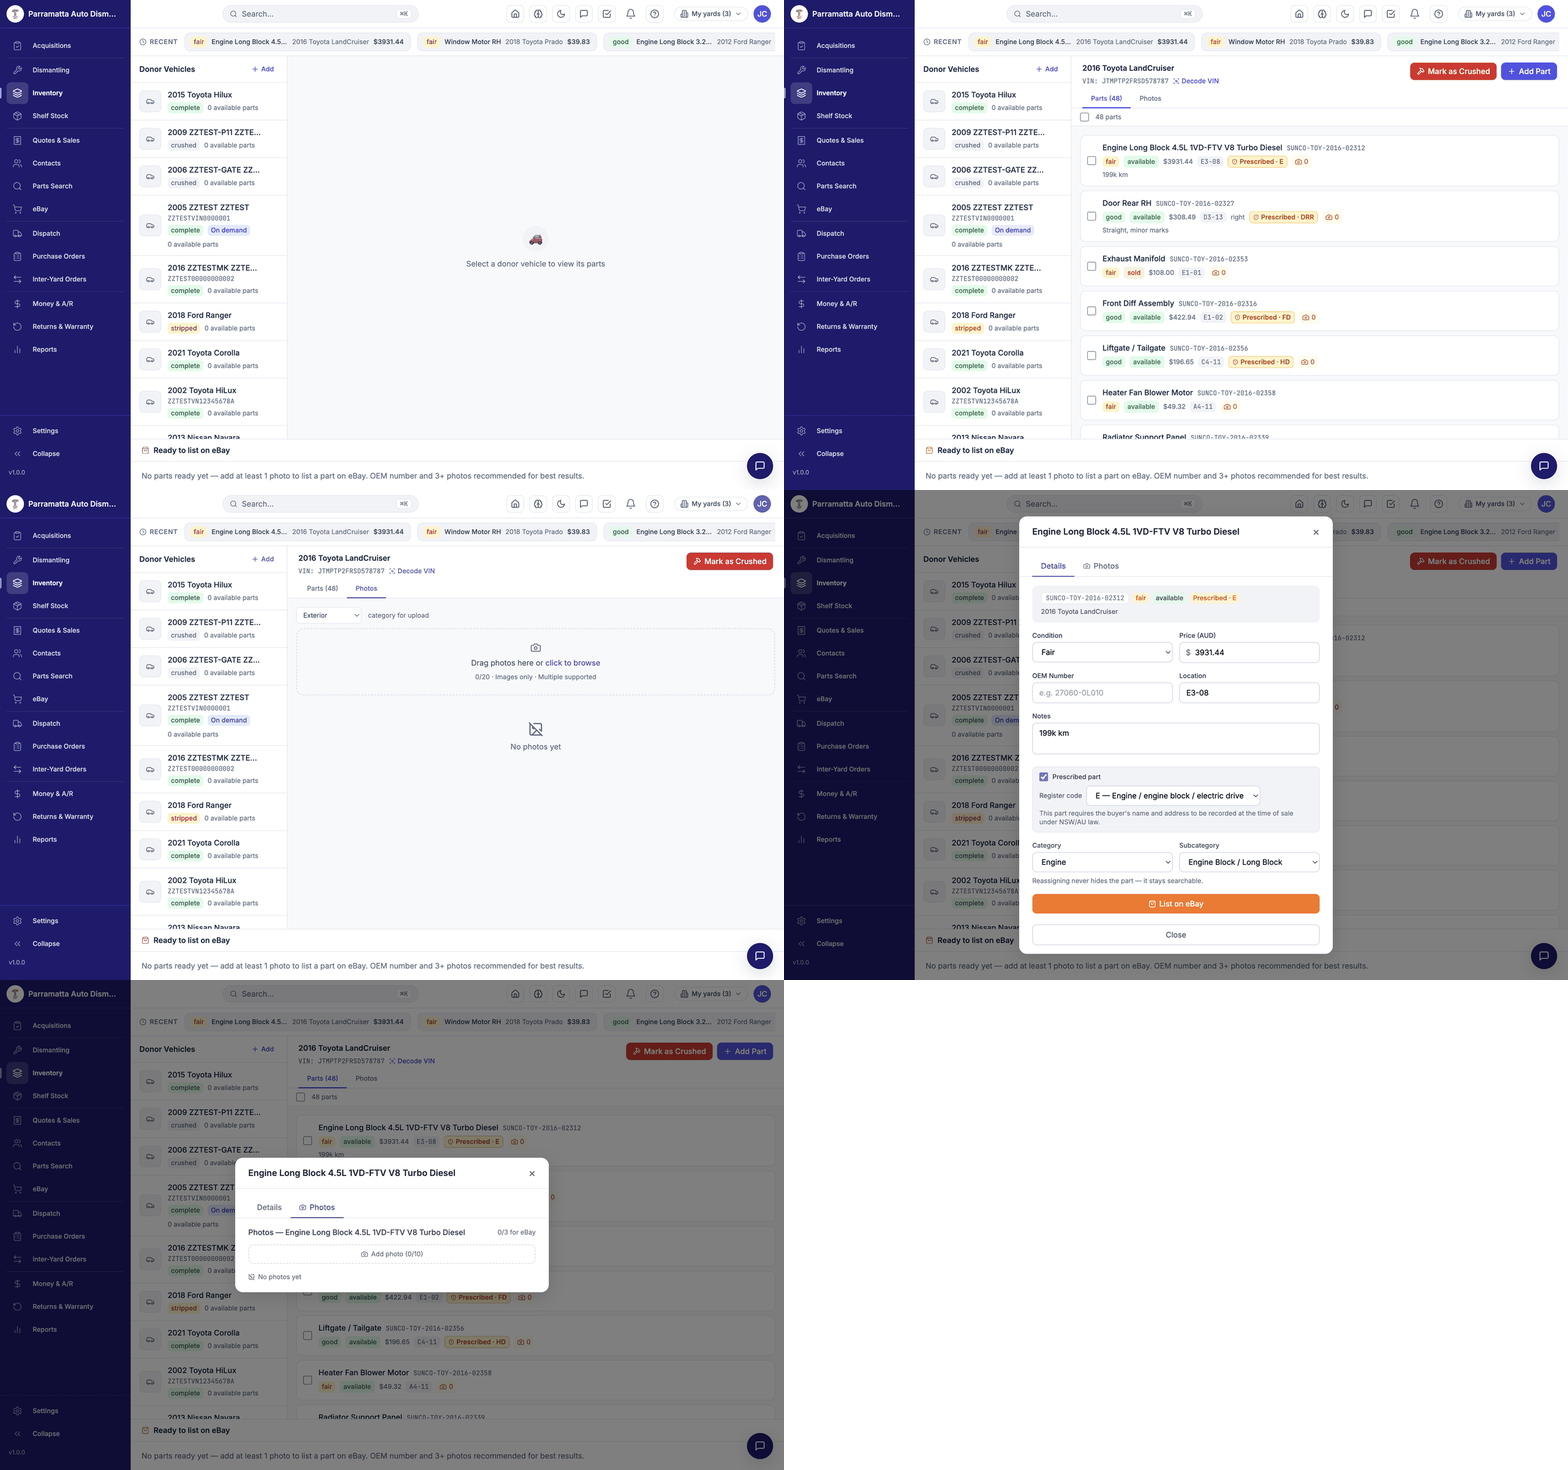 Walkthrough: the donor list, a donor's parts and photos, and the part detail panel.
The donor list
Each donor in the list shows its year/make/model, VIN (when recorded), condition badge (complete, stripped or crushed), warranty/age badges and the count of available parts. Click a donor to open its detail panel; use the search to find one by make, model or VIN.
Registering a new donor
Click Add next to the Donor Vehicles heading. The Register Donor Vehicle wizard has two steps.
Step 1 — link the acquisition
Choose Link existing acquisition and search by source, vendor or date — unlinked purchases recorded on the Acquisitions page appear here. If the purchase was never recorded, choose Create new acquisition and fill it in on the spot.
Select the record and click Continue to vehicle details.
Step 2 — vehicle details
- VIN (optional) — the 17-character VIN; WreckMate can decode it to pre-fill vehicle details.
- Registration plate (optional) — recorded on the Whole Vehicle Register and carried onto the Certificate of Destruction. Record it if the plates are still on the vehicle.
- Make / Model / Year (required) — full Australian make and model lists.
- Variant code — e.g.
GUN126,VDJ200,TGN16. - Engine — engine code or description.
- Body style — Sedan, Hatchback, Ute / Pickup, SUV, 4WD / Off-road, Van / Minivan. This choice sets the dismantling checklist template.
- Don't auto-populate dismantling checklist — tick for an empty card you'll build yourself.
- Pull parts on demand — store the vehicle whole and pull parts as orders come in (rural / low-throughput mode). Parts show as "Available on request" in network search.
- Structural damage (ARA code) — record the industry damage code if assessed.
- Notes — anything the dismantling team should know.
Register
Click Register Donor Vehicle. WreckMate creates the donor, creates its dismantling card automatically, and takes you straight to the card so work can start immediately.
The donor detail panel
Click any donor in the list to open its panel:
- Header — vehicle, VIN, Decode VIN, Mark as Crushed and Add Part actions.
- Parts tab — every part from this donor with SKU, condition, status (available, reserved, sold), price, bin location, side (left/right), a Prescribed marker with its register code where applicable, notes and odometer where recorded. Click a part to open its edit panel.
- Photos tab — upload photos by category (Exterior, Interior, Damage, Engine Bay, Undercarriage, VIN Plate, Other), up to 20 per donor, drag-and-drop. The panel also shows an eBay readiness hint — a part needs at least one photo to list, with an OEM number and 3+ photos recommended.
Deleting a donor is only possible while it has no parts attached — once dismantling has started, the parts (and the register entries behind them) keep the record alive.
How parts work — SKUs, condition and pricing, locations, photos, prescribed-part codes, and statuses.
Parts
Every dismantled part in WreckMate is a single physical unit with its own SKU, condition, price and shelf location. (Items you sell by quantity — new filters, batteries, consumables — belong in Shelf Stock instead.)
How parts get into inventory
- Dismantling cards (the standard path) — grading and ticking a part on a card creates it instantly. See Dismantling.
- Add Part on a donor's detail panel — for a part you pull outside the card workflow.
- Bulk import — CSV or a Pinnacle migration via Settings → Import.
The SKU system
[YARD]-[MAKE]-[YEAR]-[SEQ] e.g. SYDWR-TOY-2019-00342- The yard code is yours, the make code and year come from the donor, and the sequence auto-increments and is never reused.
- SKUs are permanent — once a label is printed the SKU never changes, so a label printed months ago still identifies the part exactly. Labels carry the SKU as text and barcode; scanning at the counter pulls the part up instantly.
The part edit panel
Click a part anywhere (donor panel, search, recently viewed) to open its panel. The Details tab holds:
| Field | Notes |
|---|---|
| Condition | New / Good / Fair / Poor |
| Price (AUD) | GST-inclusive selling price |
| OEM number | The manufacturer's part number — powers OEM search and cross-compatibility matching, and is strongly recommended for eBay |
| Location | Bin/shelf code, e.g. E3-08 |
| Notes | Anything the counter or a buying yard should know |
| Prescribed part | Register code, for regulated parts — see below |
The Photos tab holds up to 10 photos per part; at least 1 is required for eBay listing and 3+ are recommended.
Prescribed parts (NSW)
Regulated components — engines, gearboxes, doors, bonnets, instrument clusters, airbags, wheels, catalytic converters and other body sections — carry a register code (e.g. E engine, T/G gearbox, DRF right front door). WreckMate detects most of these automatically; the dropdown on the part panel lets you set or correct the code. Sales of prescribed parts are recorded in the Prescribed Parts Register, which must be retained for 6 years.
Part statuses
| Status | Meaning |
|---|---|
| Available | In stock and sellable — visible in search |
| Reserved | On an open quote — held so it can't be double-sold |
| Sold | Sold and invoiced — appears in a search only under "sold — not available", so the counter can see where it went |
Quantity is always 1 — one row is one physical part. If you find yourself wanting a quantity field, the item belongs in Shelf Stock.
New and aftermarket parts sold by quantity — receiving, adjusting, reorder points and how shelf items flow into quotes and purchase orders.
Shelf Stock
Shelf Stock is for new and aftermarket items you sell by quantity — filters, batteries, fluids, wiper blades, reconditioned exchange units. Unlike dismantled parts (one row = one physical part), a shelf item has an on-hand quantity that goes up when you receive stock and down when you sell.
Find it under DISMANTLE → Shelf Stock.
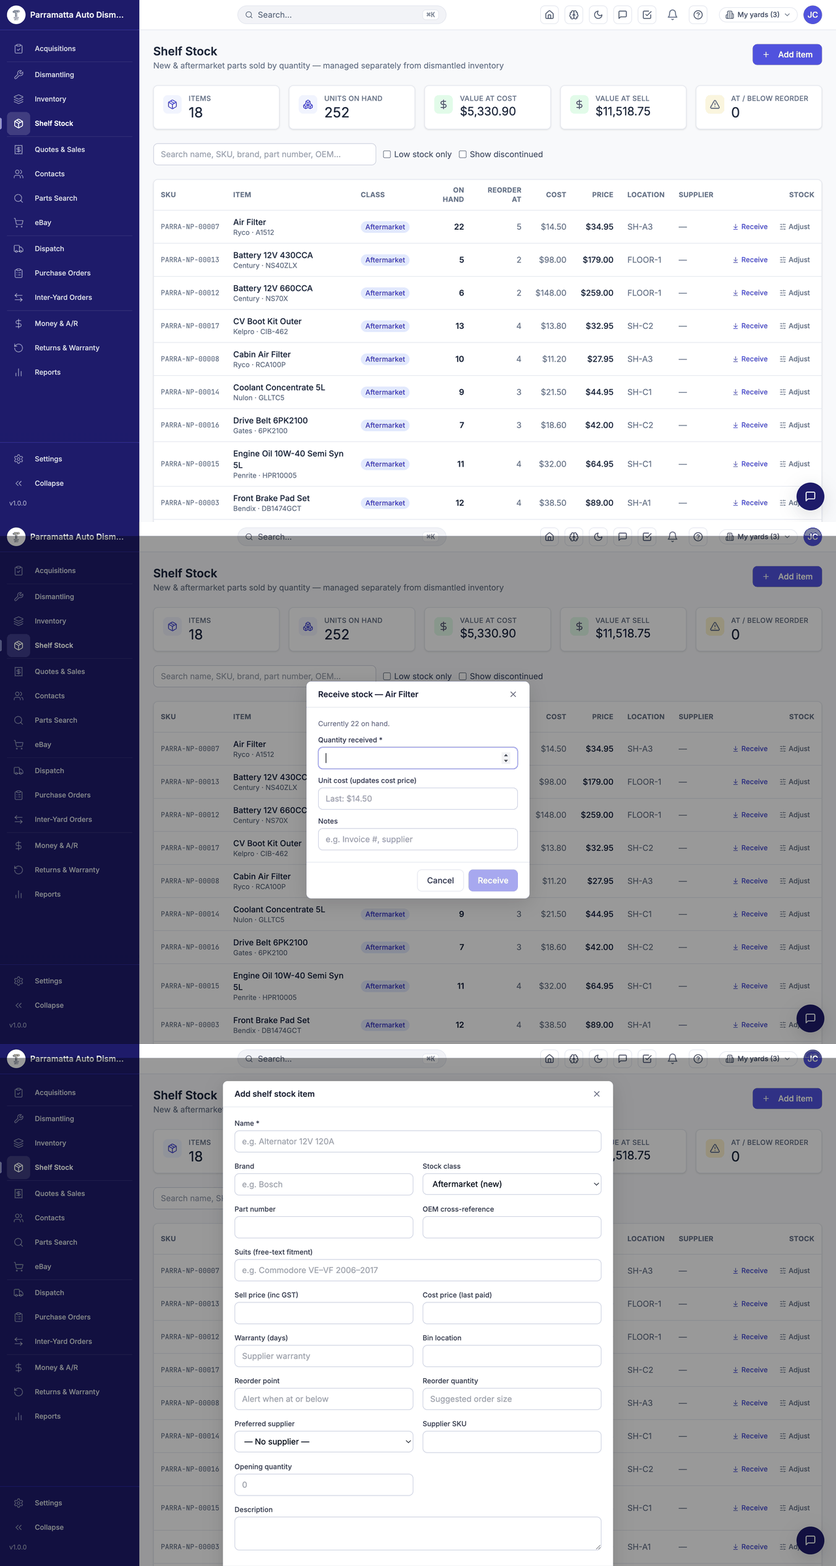 Walkthrough: the stock list with reorder columns, the Receive dialog, and the Add item form.
The stock list
The stats bar across the top shows items, units on hand, value at cost, value at sell, and how many items are at / below reorder. The table shows each item's SKU (…-NP-… numbers), name with brand and part number, stock class (Aftermarket, Genuine, Reconditioned), on hand, reorder point, cost, price, bin location and preferred supplier — with Receive and Adjust actions per row. Filters: Low stock only and Show discontinued.
Adding an item
Click Add item
From the Shelf Stock page.
Describe the item
Name (required), brand, stock class, part number, OEM cross-reference, and Suits — free-text fitment like "Toyota HiLux / Prado diesel" that shows in search results.
Price and terms
Sell price (inc GST), cost price (last paid), and warranty (days).
Stock management
Bin location, reorder point (when the low-stock flag trips), reorder quantity (how many you usually order), and preferred supplier from your vendor list.
Receiving and adjusting
- Receive records a delivery: quantity received, unit cost (updates the item's cost price), and notes. On hand goes up.
- Adjust corrects the count after a stocktake or damage — with a reason, so the movement history stays honest.
Every movement is kept as a permanent ledger entry, so on-hand counts always reconcile to history.
Where shelf stock appears
A SHELF STOCK — NEW & AFTERMARKET section shows matching items above your dismantled stock.
The add-item picker offers shelf items with an editable quantity — unlike dismantled parts, which are always quantity 1.
Adding a shelf line to a PO pre-fills the reorder quantity; receiving the PO adds to stock on hand and updates last cost. See Purchase Orders.
Set reorder points on the items you never want to run out of, then work the Low stock only filter (or the dashboard's low-stock widget) into your weekly ordering routine — the PO page does the rest.
Creating a quote, adding items, sending it with a secure accept/decline link, and completing the sale.
Quotes & Sales
In WreckMate, every sale starts as a quote. A quote assembles parts for a customer, can be emailed with a secure accept/decline link, and converts into a GST-compliant tax invoice the moment it's sold. The page lives under SELL → Quotes & Sales.
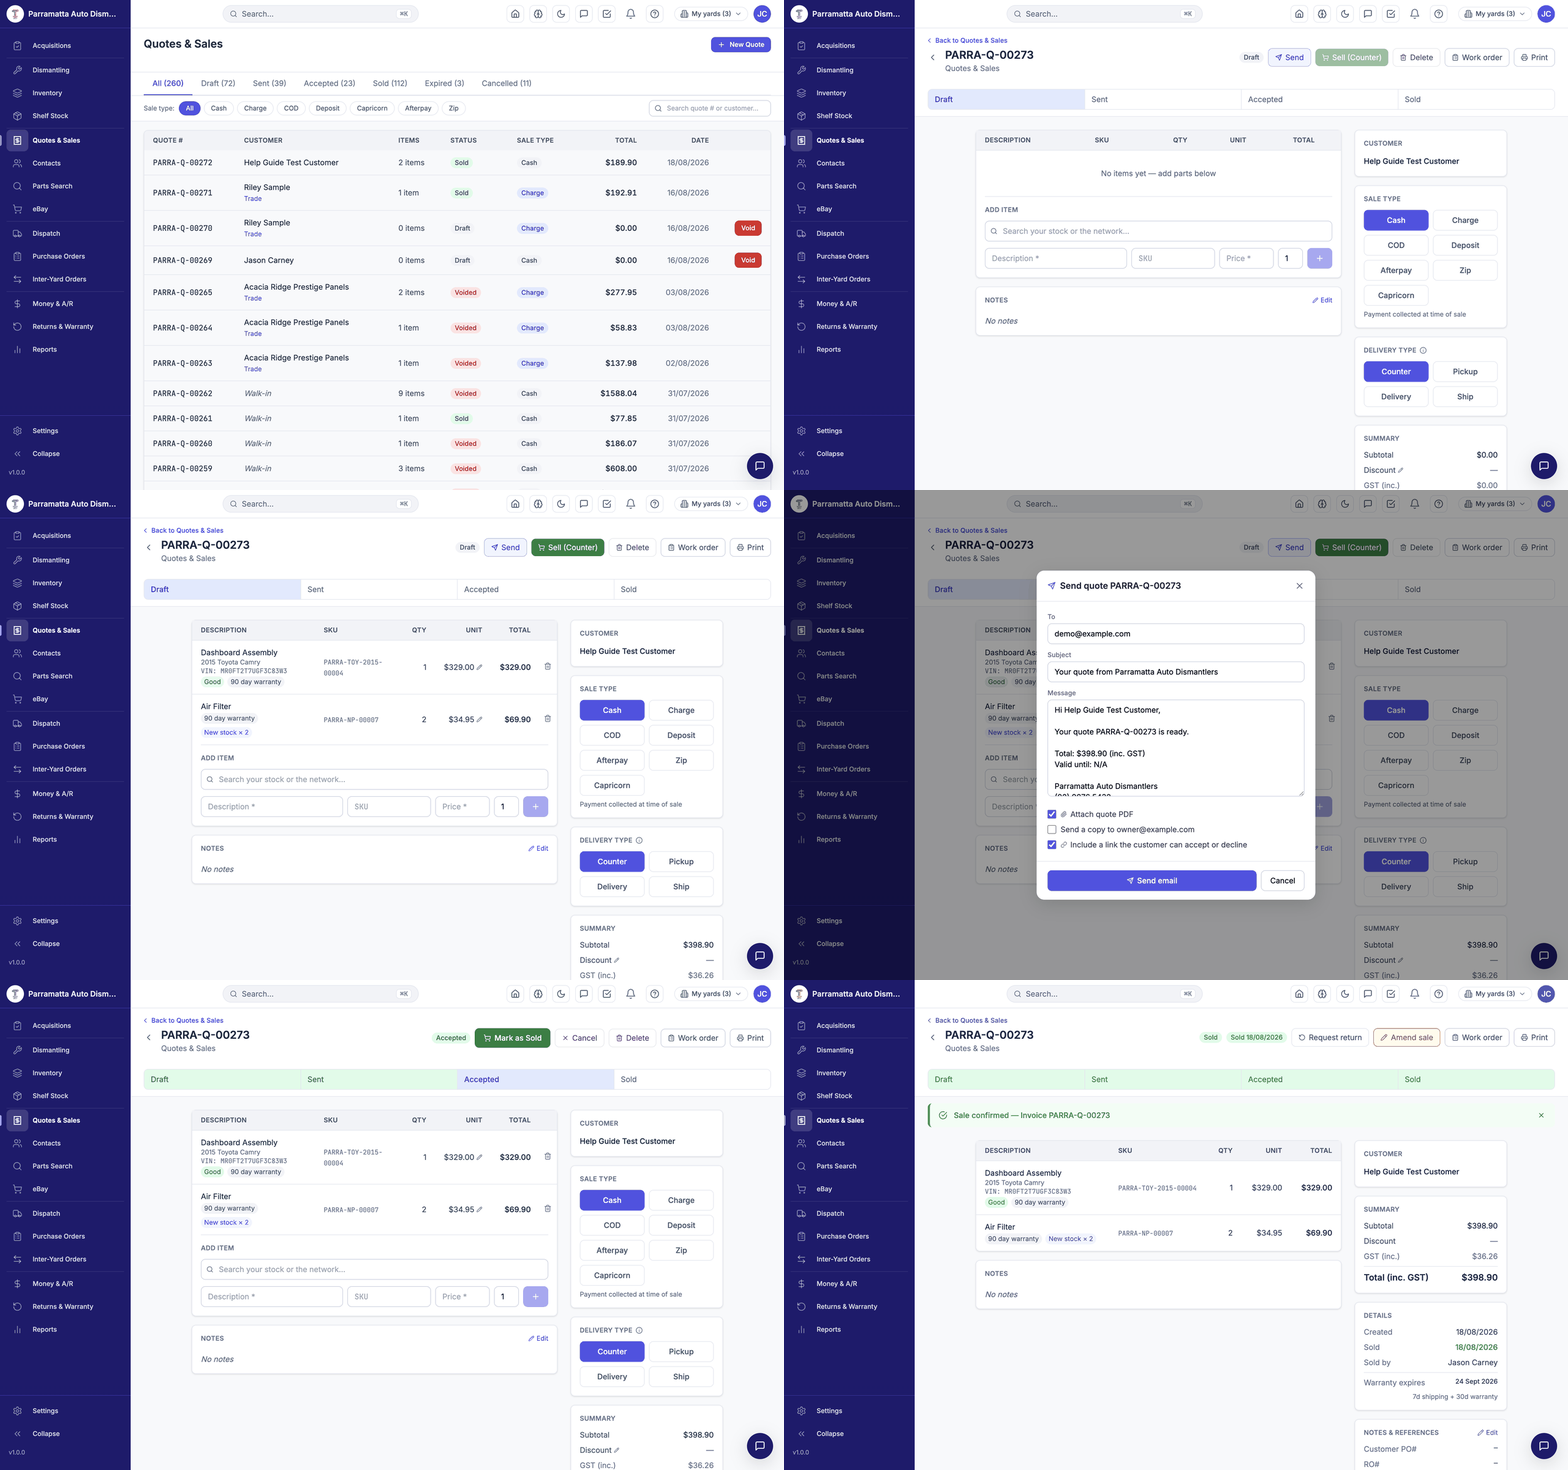 Walkthrough: new quote → new customer inline → adding stocked and shelf items → sending with the accept/decline link → Accepted → Sold.
The quotes list
Status tabs across the top — All, Draft, Sent, Accepted, Sold, Expired, Cancelled — plus a sale type filter (Cash, Charge, COD, Deposit, Capricorn, Afterpay, Zip). Each row shows quote number (YARD-Q-NNNNN), customer, item count, status, sale type, total and date.
Creating a quote
New Quote
Click New Quote. The customer is optional at this point — you can attach one later.
Pick or create the customer
Search by name. If they're new, keep typing and click + Create "…" as new customer — the full customer form opens inline (name, phone, mobile, email, address, customer type, credit limit, preferred payment). An email address is what lets you send the quote; a mobile is what lets you SMS it.
Create
Click Create Quote →. The quote opens as a Draft with its number assigned (e.g. SYDWR-Q-00272).
Adding items
The ADD ITEM search covers your stock and the network in one box — part names, SKUs or OEM numbers.
- Your dismantled stock — picking a part links it to the quote and reserves it immediately so nobody else can sell it. Quantity is locked to 1 (a part is a single physical unit); the line shows the donor vehicle, condition and warranty.
- Shelf stock — appears in its own section; shelf lines have an editable quantity.
- Custom lines — type a description and price directly for anything not in stock (postage, labour, a part you're sourcing).
Prices can be adjusted per line for this quote without touching the inventory price; any discount shows in the summary. All prices are GST-inclusive — the summary shows the subtotal, discount, the GST portion included, and the total.
Sale type and delivery
- SALE TYPE — Cash, Charge (on account), COD, Deposit, Afterpay, Zip or Capricorn. Cash-like types are collected at time of sale; Charge feeds the customer's account balance and Money & A/R.
- DELIVERY TYPE — Counter (customer collects), Pickup (you collect from the customer), Delivery (local run) or Ship (courier/post). Delivery and Ship raise the picking work that lands on the Dispatch board.
- REFERENCES — Customer PO# and RO# fields for trade customers who need them on the invoice.
Sending the quote — with an accept/decline link
Click Send on a draft:
- To / Subject / Message are pre-filled from the customer and your templates — edit freely.
- Attach quote PDF — on by default.
- Send a copy to (your address) — for your own records.
- Include a link the customer can accept or decline — adds a secure, expiring link to the email. The customer opens it in their browser and accepts or declines the quote with one click — no login, no phone tag. Links expire after your configured window (7 days by default, adjustable in Settings), and each send gets its own fresh link.
Sending marks the quote Sent. If SMS is connected for your yard, quotes can also go by text using your SMS templates.
Accepting and selling
Accepted
When the customer says yes — by phone, in person, or via the link — the quote becomes Accepted (click Mark Accepted if they told you directly; link responses update the status on their own, and a declined link marks it Declined).
Sell
Click Sell (Counter) for a walk-in paying now, or Mark as Sold on an accepted quote. A "Complete sale?" confirmation warns that inventory will update — and if any line is a prescribed part (engine, gearbox, doors, wheels and other regulated components), the sale first asks for the buyer's name and address (driver licence recommended), which goes straight into your Prescribed Parts Register as NSW law requires.
Sale confirmed
On confirm, WreckMate marks every linked part Sold, decrements shelf quantities, generates the tax invoice (same number as the quote), raises the work order for fulfilment, and shows "Sale confirmed — Invoice …".
After the sale the quote page offers Request return (starts a Return Authorisation), Amend sale, Work order (the pull-sheet PDF with SKUs, locations and pick boxes) and Print.
A completed sale is reversed through the returns workflow — not by deleting the quote. Credits net against the sale properly and keep your registers intact.
Statuses at a glance
| Status | Meaning |
|---|---|
| Draft | Being assembled — parts on it are already reserved |
| Sent | Emailed/SMS'd to the customer (accept/decline link live if included) |
| Accepted | Customer said yes |
| Sold | Invoice generated, stock updated |
| Declined / Cancelled | Customer said no, or you cancelled — reserved parts are released |
| Expired | Validity window passed without a sale |
Walk-in and phone sales — the fast path from part to paid using Sell (Counter).
Counter Sales
A counter sale is a sale completed on the spot — a walk-in who wants the part now, or a phone customer paying by card. It's the same quote engine as everything else, just driven fast: quote → Sell (Counter) → paid, in one sitting, with a proper tax invoice at the end.
The fast path
Find the part
Use Parts Search (or scan the label's barcode) to confirm stock, price and location. The result row's Quote action starts a quote with the part already on it.
Attach the customer
Pick an existing customer or create one inline. For anonymous walk-ins you can sell without a customer attached — but a name and mobile takes seconds and builds your history.
Choose the sale type
On the quote: Cash for money collected now (also use it for EFTPOS — take payment on your terminal, then confirm here), Charge for trade customers on account, COD, Deposit, Afterpay, Zip or Capricorn. Delivery type stays Counter for a walk-in.
Sell
Click Sell (Counter), confirm Complete sale? — the invoice is generated (same number as the quote) and the parts leave available stock. Print it or email it from the quote page.
WreckMate doesn't talk to your EFTPOS terminal directly — process the card on the terminal, then complete the sale. The recorded sale type is what feeds the daily reconciliation, so pick the type that matches how the money actually arrived.
Phone sales
Identical flow, except the customer isn't standing there:
- Quote the part on the phone; send the quote by email — include the accept/decline link so they can confirm in writing with one click.
- Take payment (MOTO on your terminal, or EFT).
- Mark sold. If the part is being sent, set delivery type Ship — the sale raises a work order on the Dispatch board so pick/pack/ship is tracked.
- Postage is a custom line on the quote — description and price.
Deposits, account sales and returns
- Deposit is a first-class sale type — use it for engines and gearboxes being held; partial payments are recorded against the quote.
- Charge (account) sales feed the customer's outstanding balance, aged A/R and monthly statements — see Money & A/R.
- Returns and warranty claims run through Request return on the sold quote or Returns & Warranty — no support ticket needed.
End of day
The Reconciliation tab on Money & A/R shows today's expected takings by payment type (cash, EFTPOS, EFT, COD, A/R) next to fields for what's actually in the till — count, enter, save. For a detailed listing, run the Sales report for today and export the CSV.
Customers and vendors in one place — accounts, credit limits, purchase history, and the businesses you buy from.
Contacts
The Contacts page (under SELL) holds the two lists your counter and your buyer live in: Customers — everyone you sell to — and Vendors — the auction houses and suppliers you buy from. (People you buy vehicles from are sellers, recorded on the acquisition itself — a third, separate list.)
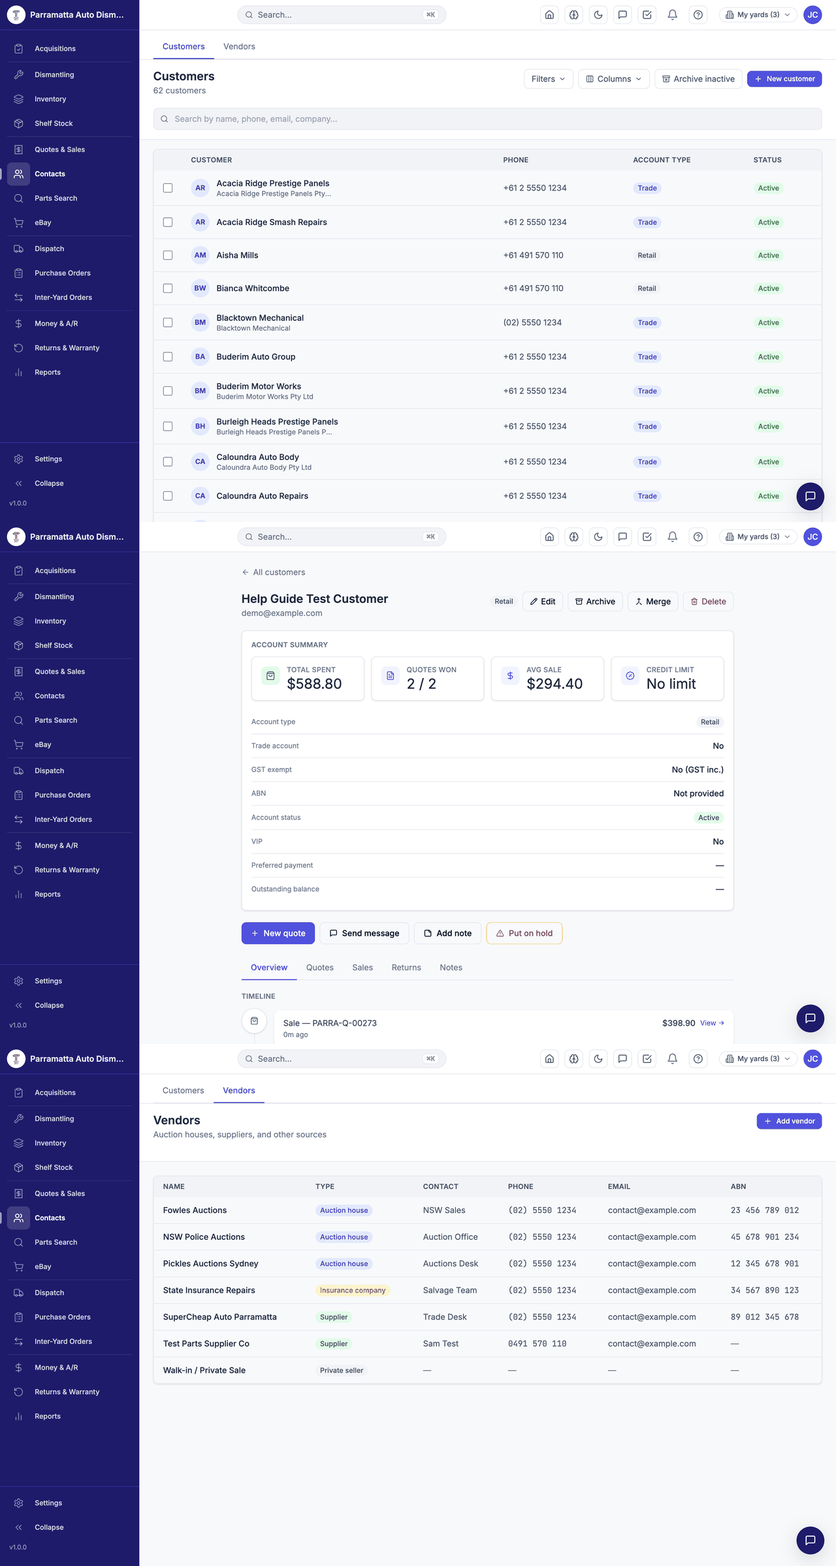 Walkthrough: the customers list, a customer's account view with activity timeline, and the vendors tab.
Customers
The list shows each customer's name, company, phone, account type (Retail / Trade) and status, with Filters, Columns, Archive inactive and New customer controls.
The customer view
Click a customer to open their account:
- Account summary — total spent, quotes won, average sale, credit limit.
- Account settings — type (Retail / Trade / Yard), trade account, GST exempt, ABN, status, VIP flag, preferred payment method, and outstanding balance (their real A/R debt).
- Actions — New quote, Send message, Add note, Put on hold, plus Edit / Archive / Merge / Delete.
- Tabs — Overview, Quotes, Sales, Returns, Notes — with a live activity timeline (quotes created, sales, returns) down the page.
Merge is permanent. Merging duplicates moves all history onto the surviving record and cannot be undone — it's restricted to managers for that reason. Check both records before you confirm.
Creating a customer
From New customer here, or inline while creating a quote — same form either way:
| Field | Notes |
|---|---|
| Name (required) | Person or business |
| Company, phone, mobile, email | Mobile enables SMS; email enables quote/invoice sending |
| Street address, suburb, state, postcode | Used for delivery and shipping |
| Customer type | Retail / Trade / Yard |
| Credit limit | No limit / No credit ($0) / Custom amount — Charge sales check this |
| Preferred payment | Cash, Card, EFT, Capricorn, COD, Charge account |
| VIP | Flags them for your staff |
Accounts and balances
Charge (account) sales accrue to the customer's outstanding balance; payments and credits reduce it. Balances age into 0–30 / 31–60 / 61–90 / 90+ buckets on Money & A/R, where monthly statements are generated and emailed. Afterpay and Zip are treated as cash-like — they don't create debt.
Archive, don't delete. Archiving hides an inactive customer without touching history. Deleting is only for records with no transactions — invoices are tax records and keep their customer.
Vendors
The Vendors tab lists the businesses you buy from — auction houses, parts suppliers, insurers — with type, contact person, phone, email and ABN. Add them here (Add vendor), then pick them on acquisitions and purchase orders; a shelf item's preferred supplier also comes from this list.
GST-compliant tax invoices generated from every sale — numbering, sending, payments and records.
Invoicing
Every completed sale generates a tax invoice automatically — there is no separate invoicing step. The invoice carries the same number as its quote (YARD-Q-NNNNN), so the quote you discussed on the phone and the invoice the customer pays are one reference.
GST on invoices
WreckMate itemises 10% GST on every invoice as Australian law requires. Prices in WreckMate are GST-inclusive — the price you put on a part is the price the customer pays, and the invoice breaks out the GST portion included in it:
Subtotal                 $189.90
GST (included)            $17.26
Total (inc. GST)         $189.90
Your business name and ABN come from Settings → Yard Profile — make sure they're right before your first sale, because they appear on every invoice.
Inter-yard (network) prices are also GST-inclusive across the platform, so yard-to-yard trading invoices reconcile the same way.
Finding, printing and sending invoices
- From the quote — a sold quote is the invoice's home: open it from Quotes & Sales (Sold tab) and use Print.
- From the customer — the Sales tab on their Contacts record lists every invoice.
- By email — the send dialog emails the PDF to the customer, from your yard's branding with replies going to your customer contact email (Settings → Yard Profile).
Payments and balances
- Cash-like sales (Cash, EFTPOS, Afterpay, Zip) are settled at the counter and appear in the day's reconciliation.
- Charge (account) sales post to the customer's outstanding balance. Partial payments are recorded against the quote, and what remains ages through the 0–30 / 31–60 / 61–90 / 90+ buckets on Money & A/R, where you generate and email monthly statements.
- COD sales are tracked on their own Money & A/R tab until the driver brings back payment.
- Capricorn sales are claims against the member's Capricorn account, not customer debt — they're excluded from credit limits and aging, and settle through the Capricorn claims export.
Credits, amendments and records
- Returns produce credits — process the return under Returns & Warranty; the credit nets against the original sale rather than rewriting it.
- Amend sale on a sold quote handles a genuine after-sale correction; the paper trail is kept.
- Invoices are retained permanently and export from the Sales report as CSV for BAS preparation and your accountant. The BAS tab on Money & A/R computes the GST figures from the same ledger.
- With Xero or MYOB connected (Settings → Integrations), invoices sync to your accounting file — manually per sale, in a daily batch, or automatically on sale, per your sync mode.
Connecting your eBay store, getting parts ready to list, publishing listings and tracking eBay sales.
eBay
The eBay page (under SELL) runs your eBay channel: connection status, active listings, and sales totals. Listings publish straight from your inventory with the title, category and item specifics built for you — and an eBay sale marks the part sold in WreckMate instantly, so the same part can never sell twice.
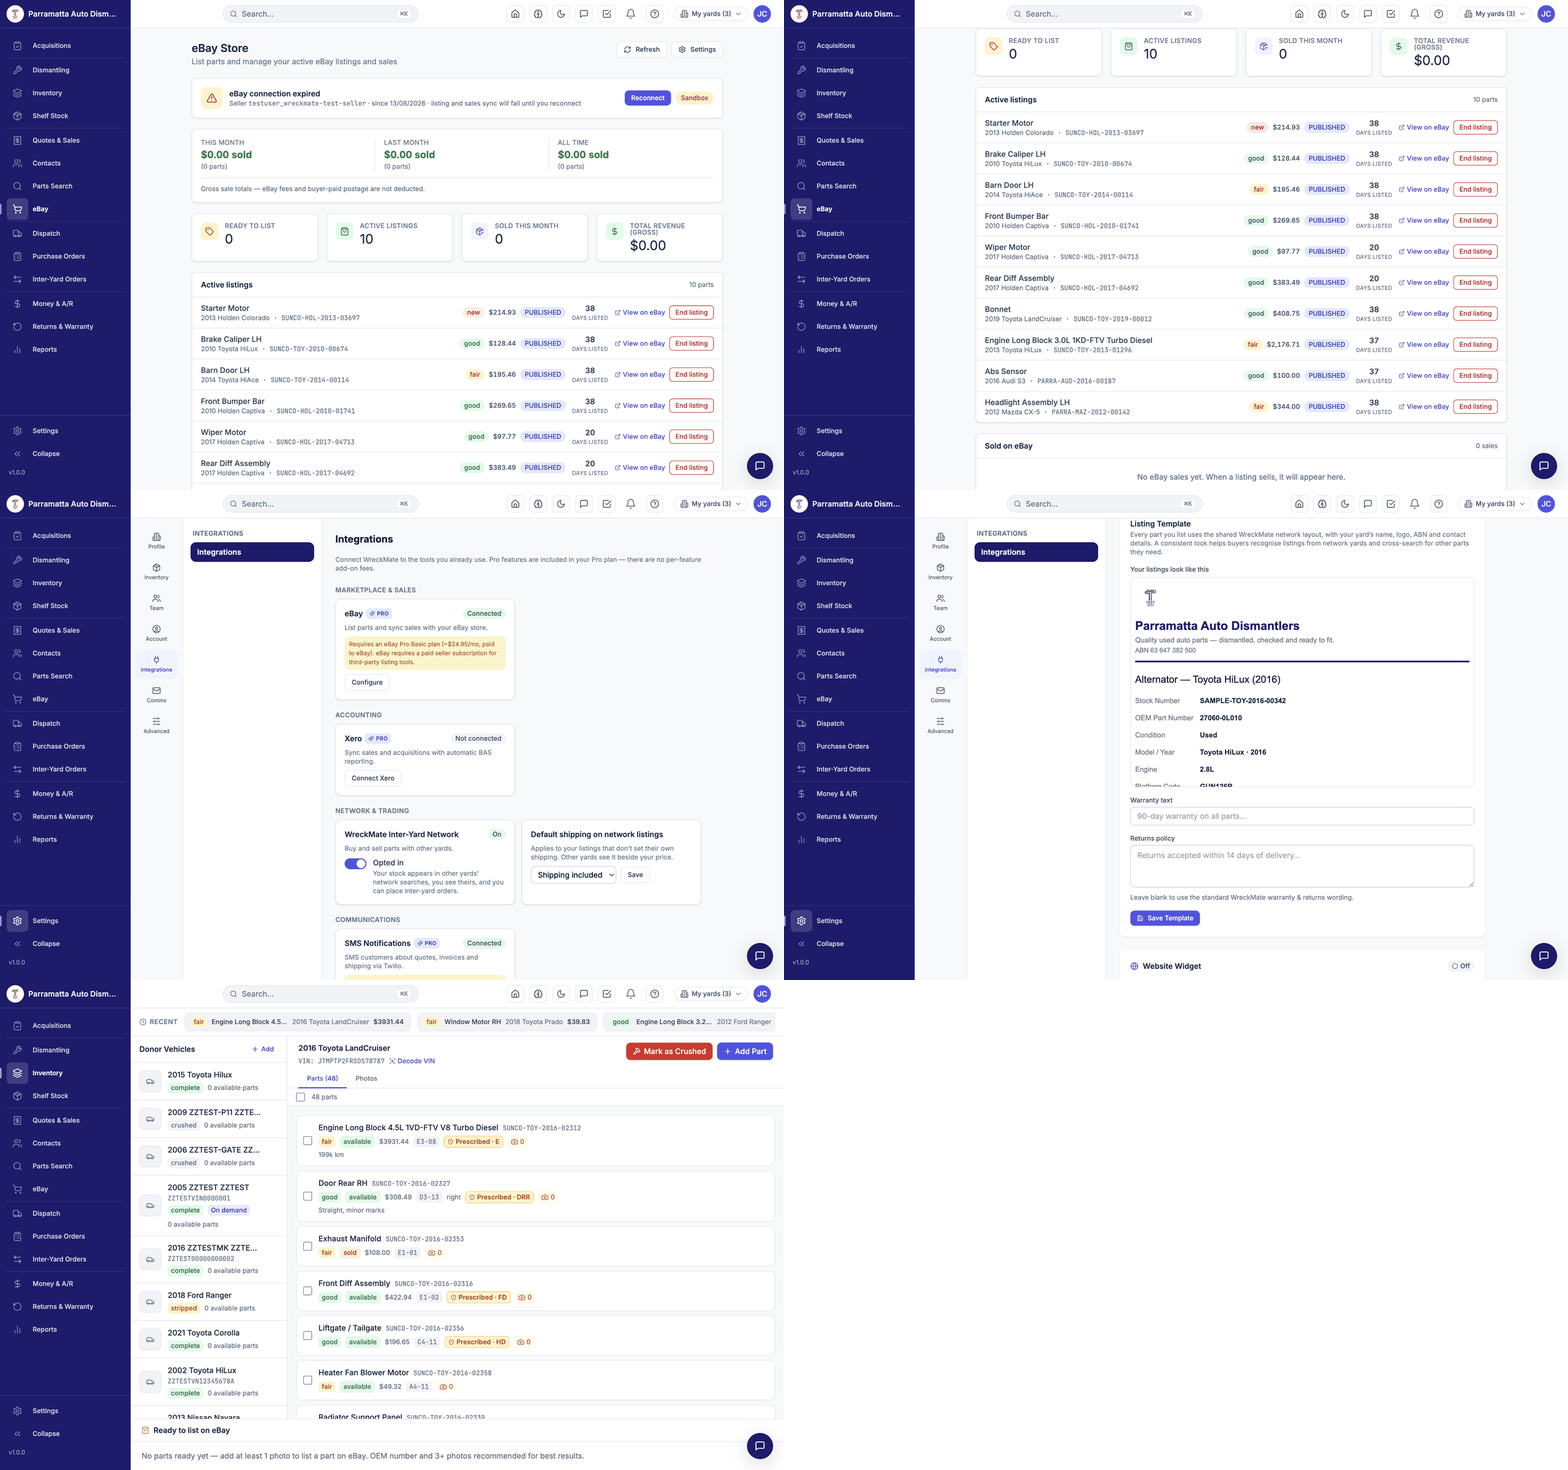 Walkthrough: connection status and stats, active listings, the go-live checklist and listing template in Settings, and the readiness gate.
Connection
The status card at the top shows your linked seller account, whether you're on Sandbox (eBay's test environment) or production, and when the connection was made. eBay connections expire periodically — when the card says eBay connection expired, click Reconnect and sign in to eBay again; listing and sales sync pause until you do.
eBay requires a paid seller subscription (an eBay Pro Basic store, ~$24.95/month paid to eBay) for third-party listing tools like WreckMate.
Reading the page
- Sales stats — this month, last month and all-time totals. These are gross figures: eBay's final-value fees and buyer-paid postage are not deducted.
- Ready to list — how many parts currently meet the listing requirements.
- Active listings — each with part, SKU, condition, price, status, days listed, View on eBay and End listing.
Getting a part ready to list
A part is listable once it has:
- At least one photo (3+ recommended — they become the eBay gallery)
- A price and condition
- An OEM number (recommended — it feeds eBay's compatibility data)
Donor panels show a "Ready to list on eBay" section that tells you exactly what's missing. Add photos on the part's Photos tab and the part joins the ready pool.
Publishing a listing
List the part
From a ready part, choose List on eBay.
Review the preview
The preview shows the generated title, the eBay category (mapped automatically from the part's category), the item specifics eBay will receive (brand, engine size, fuel type and so on — drawn from your part and donor data, only where eBay's own category accepts them), and the price. Any warnings — like a category downgrade because eBay demands specifics we can't supply — are named here before you commit.
Publish
Confirm to publish. The listing appears under Active listings and on eBay itself.
When the part sells — on eBay or over your counter — the other channel is closed out automatically: an eBay sale marks the part sold in WreckMate, and a counter sale ends the eBay listing. A failed listing-end never blocks your counter sale.
Configuration (Settings → Integrations → eBay)
- Seller policies — create Fulfillment, Payment and Return policies in your eBay Seller Hub, then enter their IDs here. Required before listing.
- Listing template — choose the description template your listings use.
- Go-live checklist — the panel walks you from sandbox to production: policies set → test listing created in sandbox → webhook verified → template selected → Switch to production. Switching disconnects the sandbox account; you then reconnect with your live eBay login.
Do the full checklist in sandbox first. It's a free rehearsal of policies, webhooks and a real listing — production problems are all discovered cheaply there.
One search for everything — part name, SKU or OEM number, vehicle filters, your stock, shelf stock and the network.
Parts Search
Parts Search is the screen your counter staff will use dozens of times a day. One page searches your dismantled inventory, your shelf stock and every other WreckMate yard in the network — in one go.
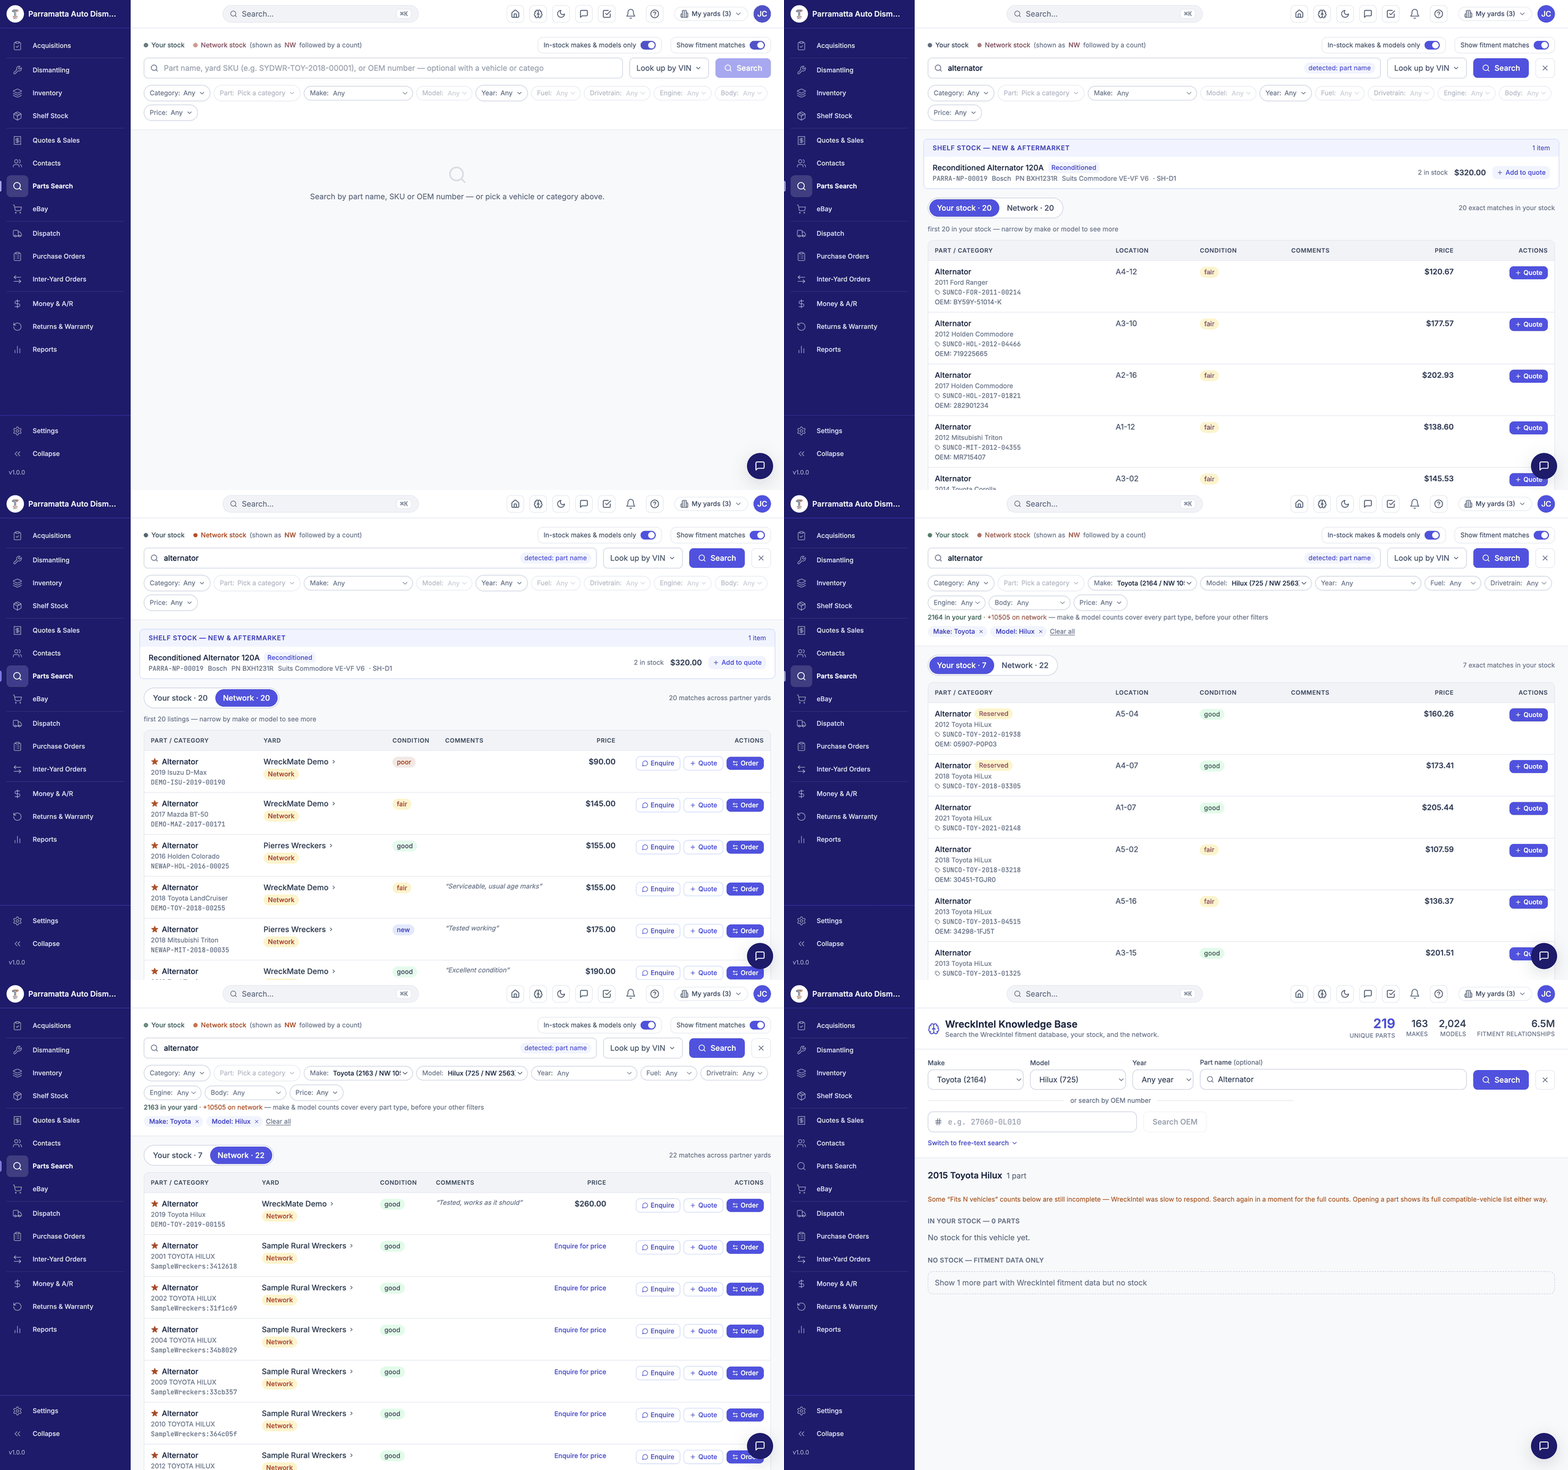 Walkthrough: a part-name search, the Your stock and Network result tabs, vehicle filters, fitment matches, and the WreckIntel Knowledge Base.
One search box, three kinds of input
Type any of these into the search bar — WreckMate works out which one you mean and shows a detected: badge (for example detected: part name) so you can see how your input was read:
- A part name —
alternator,left headlight,bonnet - A yard SKU — e.g.
SYDWR-TOY-2018-00001(any yard's SKU format) - An OEM number — the manufacturer's part number, exactly as printed
You can also search with no text at all — just pick a vehicle or category from the filter chips and press Search.
The filter chips
Under the search bar is a row of filter pills: Category, Part, Make, Model, Year, Fuel, Drivetrain, Engine, Body and Price.
- Make and Model show stock counts —
Toyota (12 / NW 340)means parts in your stock / parts network-wide for that make. Green numbers are your stock; NW (orange) is network stock. - Those make/model counts cover every part type for that vehicle, before your other filters are applied — the page reminds you of this whenever another filter is active, so a make showing hundreds of parts beside an empty result list is not a contradiction.
- In-stock makes & models only — this toggle trims the Make/Model option lists to vehicles you actually have stock for. It never filters your results.
- Show fitment matches — widens results to parts that fitment data says suit the searched vehicle, beyond exact text matches.
- Price — bounds apply per unit.
The search text and the Category/Part chips are alternative ways to say what part you want. Setting one clears the other — visibly, never silently — so the search always means exactly what's on screen.
Look up by VIN
Click Look up by VIN and enter a VIN to identify the vehicle and apply its make, model and year to the search — useful when a customer reads their VIN over the phone but isn't sure of the exact model year.
Reading the results
Shelf stock
If your search matches any new or aftermarket shelf items, they appear first in a SHELF STOCK section, with brand, part number, what they suit, bin location, quantity in stock and price. Click Add to quote to sell one.
Your stock · Network
Below shelf stock, results split into two tabs:
Your stock — parts in your yard:
| Column | What it shows |
|---|---|
| Part / Category | Part name, donor vehicle, SKU, OEM number |
| Location | Bin/bay code |
| Condition | new / good / fair / poor |
| Comments | Notes recorded on the part |
| Price | Your listed price |
| Actions | Quote — add the part to a quote |
Parts already held for a customer show a Reserved badge.
Network — matching parts at other WreckMate yards:
- The ★ star marks (and lets you set) favourite yards — favourites rank higher in results.
- Each row shows the part, vehicle, listing SKU, yard name, condition, comments and price.
- Comments on a network listing are the listing yard's own intake notes, shown read-only — and only when the listing is a single unit, so one unit's notes are never presented as describing a group.
- Actions: Enquire (opens a direct message with that yard), Quote (quote it to your customer), Order (place an inter-yard order).
Result lists are capped, and the page says so honestly — for example "first 20 in your stock — narrow by make or model to see more". If you see that notice, add a vehicle filter rather than scrolling for a longer list.
Sold — matches this search
Below the live results, a SOLD — matches this search, not available section lists recently sold parts that would have matched, with the sale reference and date. When a customer asks "do you still have that alternator?", this is how you answer — you can see it sold, on which quote, and when, instead of the part simply vanishing from search.
Condition grades
| Grade | Meaning |
|---|---|
| New | Unused (usually shelf stock or NOS) |
| Good | Excellent condition, minimal wear |
| Fair | Minor wear or cosmetic issues |
| Poor | Significant wear or damage — disclosed |
Always mention the grade before quoting. A customer expecting a perfect part who receives a fair one may not be satisfied even at a fair price.
Worked example
Customer calls: "Got an alternator for a 2015 HiLux?"
- Type
alternator, set Make: Toyota and Model: Hilux, press Search. - Your stock shows your matching alternators with locations and prices — quote straight from the row.
- Network shows other yards' HiLux alternators if you're out of stock — Enquire or Order.
- If a matching part shows in the Sold section instead, you can tell the customer exactly when it went and offer the network alternative.
The WreckIntel Knowledge Base — what fits what, where the data comes from, and what the confidence disclaimer means.
Compatibility & Fitment
WreckMate's fitment intelligence comes from WreckIntel — a fitment database built from real-world Australian market data, covering millions of part-to-vehicle fitment relationships across more than a hundred makes. It powers the fitment matches in Parts Search and the WreckIntel Knowledge Base page.
Understanding how it works helps you give customers better advice and avoid selling parts that don't fit.
The WreckIntel Knowledge Base
Open it from the book icon in the header bar. The page shows summary tiles (unique part types, makes, models and fitment relationships in the database), then lets you explore:
Pick a vehicle
Choose a Make, then a Model, and optionally a Year. The number beside each option is how many parts you have in stock for it — so Hilux (725) means 725 HiLux parts in your yard.
Optionally narrow to one part
Use the part name filter to look at a single part type, or leave it blank to see every part term for the vehicle. You can also search by OEM number, or switch to a free-text search.
Read the results
Results group into IN YOUR STOCK (part types where you hold matching parts) and NO STOCK — FITMENT DATA ONLY (part types the database knows for this vehicle that you don't currently stock). Each row combines your stock, network stock and fitment data.
Open a part for the full picture
Opening a part shows its full compatible-vehicle list — every vehicle configuration the database records for it, useful when a "Fits N vehicles" summary elsewhere could only show the first page of matches.
If the fitment service is still crunching numbers you'll see a notice that some counts are incomplete — "Search again in a moment for the full counts." Opening a part always shows its full compatible-vehicle list either way.
How fitment is matched
When you search for a part on a specific vehicle, WreckMate:
- Looks up the exact vehicle (make, model, year) in WreckIntel
- Finds fitment records linking that vehicle to the part type
- Checks cross-fitment — the same part confirmed on other vehicles, usually via shared OEM numbers
- Returns matches, flagging any that need verification
Cross-fitment is where the value is: many parts are shared across model years and even across brands. Ford Ranger and Mazda BT-50 share a platform, so many mechanical parts interchange — the database records this through their shared OEM numbers and surfaces both.
Fitment confidence
Every match carries a confidence level derived from the strength of the underlying data:
- High confidence — shown plainly. The data strongly supports the fit.
- Lower confidence — shown with a verify fitment disclaimer. The part is likely to fit, but there may be variant differences (engine size, trim level, facelift changes) the data can't fully resolve.
When you see the disclaimer, recommend the customer confirm the fit before installation — especially for mechanical, electrical or safety-related parts.
Fitment data is a guide, not a guarantee. Always advise customers to verify fit before installation, particularly for safety-critical components (brakes, airbags, suspension), electrical parts that need module programming, and anything where a wrong fit could cause damage.
Reverse lookup — "what does this part fit?"
Searching Parts Search by part name or OEM number without a vehicle shows other vehicles that take the same part type, labelled Other vehicles with this part type. For the complete answer on a specific part, open it in the Knowledge Base — its compatible-vehicle list is the full record, not a preview.
Use this when:
- A customer asks "will this part from your ad fit my car?"
- You want to know how broadly a dismantled part can be sold
- You're pricing a part and want to understand its demand pool
What the database doesn't cover
- Aftermarket modifications (lifts, engine swaps)
- Grey imports never officially sold in Australia
- Some niche or low-volume vehicles
If no fitment data exists for a combination, it doesn't mean the part doesn't fit — it means there's no data for it yet. The database grows continuously from real listing and sales activity across the network.
Finding parts by yard SKU, barcode scan, or OEM number — and the ⌘K global search.
SKU & OEM Search
Sometimes you already know exactly what you're looking for — a SKU from a label, a barcode to scan, or an OEM number from a catalogue. The same Parts Search box handles all of them, and shows a detected: badge so you can see how it read your input.
Searching by SKU
Every part in WreckMate has a unique SKU in the format YARD-MAKE-YEAR-SEQ:
SYDWR-TOY-2019-00342Type or paste the SKU into the Parts Search bar — a detected: SKU badge confirms it — and press Enter. A partial SKU works too: SYDWR-TOY-2019 lists matching 2019 Toyota parts.
Labels printed from WreckMate carry the SKU, and a printed SKU never changes — the label on the shelf always matches the record.
Barcode scanning
USB and Bluetooth barcode scanners emulate keyboard input, so they work with no setup: click into the search field, scan the label, and the part record opens.
Train counter staff to scan rather than type. It's faster and prevents the transcription errors that lead to pulling the wrong part off the shelf.
Searching by OEM number
Customers sometimes call with an OEM number from a dealer quote or workshop manual. Enter it exactly (including hyphens) — a detected: OEM number badge confirms it — and WreckMate returns:
- Parts in your stock recorded with that OEM number
- Network parts that match
- Cross-referenced matches, where fitment data links the number to equivalent parts
OEM numbers are optional on parts, but recording them dramatically improves search — and they're what powers cross-yard matching. Encourage dismantlers to photograph the manufacturer's part sticker before shelving a part.
Global quick search (⌘K)
From anywhere in WreckMate, press ⌘K (Mac) or Ctrl+K (Windows), or click the Search… box in the header. It searches parts, vehicles, customers and orders in one place, with live results as you type — the fastest way to jump to anything without touching the menu.
The same search powers the add-item picker inside a quote, so a part you can find in ⌘K is a part you can quote.
From search to action
Opening a part from any search shows its full record — SKU, condition, price, OEM number, location, notes, photos and its prescribed-part register code if it has one — with editing and photo upload in the same panel. From a search result row you can add the part straight to a quote with the Quote button.
How the WreckMate network works — what other yards see of your stock, favourites, hiding yards, and turning a network result into a sale.
The Yard Network
The WreckMate network connects participating yards across Australia. When you search for a part, results include matching stock from every other network yard — so you can sell parts you don't physically hold by sourcing them from another member.
Joining the network
Network visibility is a per-yard opt-in, switched on under Settings → Integrations → Network. It's two-way by design: when it's on, other yards see your available stock in their searches and you see theirs. Turning it off removes your listings from their results and theirs from yours.
While you're opted in you can also set a default shipping label for your listings — Not stated, Shipping included or Shipping extra. It applies to listings that don't set their own, and other yards see it beside your price.
What other yards see — and don't
They see: part name and vehicle, listing SKU, condition, price, your yard's name, the shipping label, and (for single-unit listings) the intake notes recorded on the part.
They don't see: your acquisition costs, margins, customers, sales data, or anything else about your operation.
Parts that are unpriced, sold or from unsold work-in-progress don't appear to other yards. Reserved parts show with a Reserved badge.
Searching the network
Network results appear automatically in every Parts Search — the Network tab sits beside Your stock, and network makes/models show as orange NW counts in the filter chips. There's no separate network search to run.
From a network row you can:
- Enquire — open a direct message with the yard, with the part attached to the conversation for context
- Quote — put the part on a quote for your customer
- Order — place an inter-yard order, where the supplying yard ships directly to your customer
Favourites and hiding yards
- Click the ★ on a network row to favourite that yard — favourites rank higher in your network results. Favourites change ranking only; they never hide anyone.
- If you'd rather not see a particular yard's listings, you can hide them from your results. Hiding is one-directional and visibility-only — it doesn't stop messages or orders, and the other yard isn't notified.
Pricing network parts for your customer
When you sell a network part, the Order form does the arithmetic for you: it shows the supplier's price, you enter your sale price to the customer (inc. GST), and it displays your margin before you commit. Delivery is drop-ship — the supplying yard sends the part directly to your customer with your yard's details on the paperwork, so your customer relationship stays yours.
There's no standard margin — price to cover the supplier's price and your handling, the same way you'd handle any trade supply arrangement.
If the network turns up nothing
- Broaden the search — try adjacent years or the part category instead of an exact name.
- Turn on Show fitment matches — parts from other vehicles that fitment data says suit the searched one.
- Check the Sold section — if matching parts sold recently, demand exists; consider prioritising that part next dismantle.
- Source externally — new aftermarket, or list a customer request and keep an eye on the network as yards join.
Direct messages with other yards and your own staff — starting a conversation, part and order context, and privacy controls.
Messaging
WreckMate's messaging is built around direct messages — with other yards in the network, and with your own staff. Following up a parts enquiry or coordinating an inter-yard order happens inside WreckMate, without swapping phone numbers or dropping to email.
Opening your messages
Click the chat icon in the header bar (it shows an unread badge when something's waiting), and the dashboard's Unread messages widget shows your count at a glance.
How conversations work
A conversation between your yard and another is one continuous thread — there's a single ongoing conversation per yard pair, and everything you discuss accumulates in it. When you talk about a specific part or order, that item is linked to the conversation, so the thread carries its own context: scroll back and you can see exactly which parts and orders you've discussed and when.
This means an enquiry from six months ago, the order that followed it, and today's follow-up all live in the same place.
Starting a conversation
From a network search result — click Enquire on any network row in Parts Search. The conversation with that yard opens (or continues) with the part attached.
From an inter-yard order — every order's Message button deep-links into the conversation with the other yard, with the order linked for context.
From the directory — inside Messages you can browse the network directory, favourite the yards you deal with most, and start a conversation directly.
Staff messaging
The same messages surface handles conversations with your own staff. Display names come from each staff member's profile.
Notifications
Push notifications can alert staff to new messages on any device where they've allowed them. Order and network alerts by email are configured under Settings → Comms.
Privacy and control
- Disabling inter-yard messaging — under Settings → Comms, a yard can switch off inter-yard messaging entirely. This blocks new inter-yard conversations in both directions; messaging between your own staff is never affected.
- Blocking — blocking another yard (or a user blocking another user) is silent and bidirectional: neither side can message the other, and the blocked party isn't notified. Blocking also removes each other's stock from network search.
- Conversation history stays available — a thread is never deleted out from under you.
Network etiquette
Do:
- Reply to enquiries promptly during business hours — the yard on the other end has a customer waiting
- Be upfront about condition, price and freight in your first reply
- Say so in the thread if a part sells, so the other yard can move on
Don't:
- Leave enquiries hanging for days
- Quote one price in the thread and invoice another without explanation
Pick, QA, pack, dispatch and deliver — the work order board, routes and manifests, and couriers.
Dispatch & Work Orders
The Dispatch page is one board for everything that happens between a sale and the part arriving with the customer: pick, QA, pack, dispatch and deliver. Sales staff, the yard floor and accounts all read the same board.
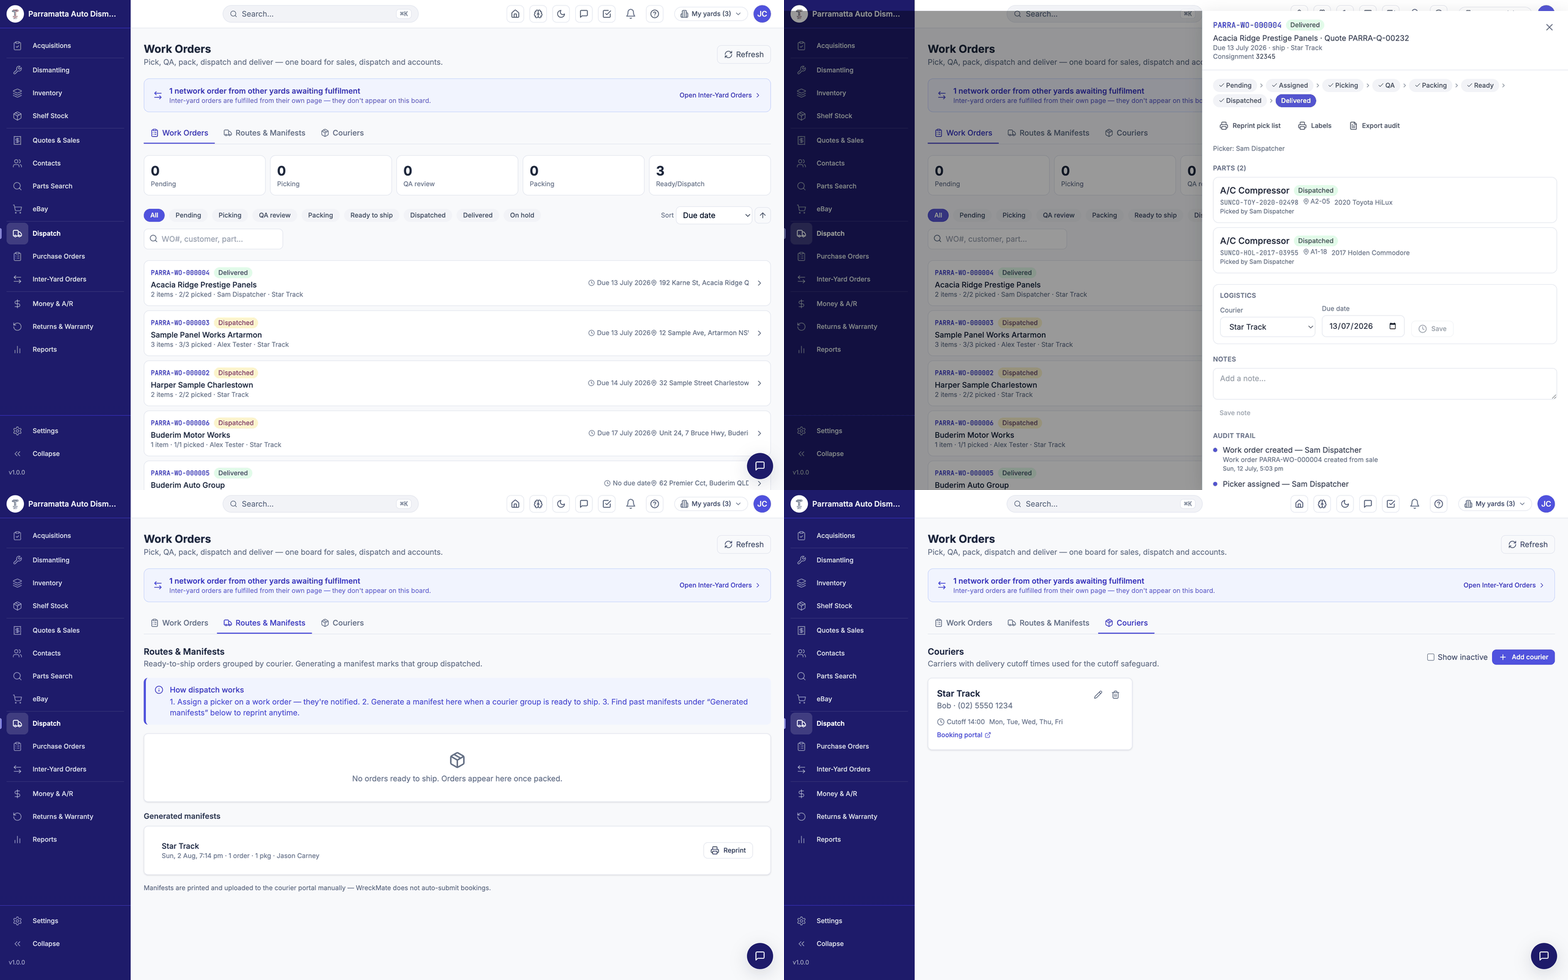 Walkthrough: the work order board, a work order's detail with its audit trail, Routes & Manifests, and Couriers.
A work order is raised automatically when a sale needs fulfilment — there's nothing to create by hand. Each carries a number like SYDWR-WO-000004.
Inter-yard orders are fulfilled from their own page, not this board — the page says so and links straight to Inter-Yard Orders.
The board
Across the top: live counters for each stage — Pending, Picking, QA review, Packing, Ready to ship — plus filters for Dispatched, Delivered and On hold, and sorting by due date, date created, last updated or order number.
Each card shows the order number and status, the customer, items with picked progress (e.g. 2 items · 2/2 picked), the assigned picker, the courier, the due date and the delivery address.
Working an order
Click a card to open the full work order:
Assign a picker
Choose a staff member — they're notified. The order moves to Assigned.
Pick
The pick list (reprintable from the order) carries SKUs, locations and pick boxes. Each part is ticked off with who picked it recorded.
QA and pack
QA review confirms the right parts in the right condition; packing readies the consignment. Print labels from the order.
Dispatch and deliver
Record the courier and consignment number under Logistics, mark dispatched (or dispatch via a manifest — below), then mark delivered when it lands.
The order's stage stepper — Pending → Assigned → Picking → QA → Packing → Ready → Dispatched → Delivered — shows exactly where it's up to.
The audit trail
Every step is recorded with who and when — creation, assignment, each pick, each stage change — and the trail is permanent. Export audit produces the full record for an order, useful for disputes ("it was picked by X on Tuesday, dispatched Wednesday on consignment 32345").
Routes & Manifests
The Routes & Manifests tab groups ready-to-ship orders by courier. When a courier group is ready:
- Orders appear here once packed.
- Generate a manifest — this marks the whole group dispatched in one step.
- Past manifests stay under Generated manifests and can be reprinted anytime.
For local runs with your own drivers, create named Delivery Routes under Settings → Advanced → Delivery Routes — routes are created per day and orders are assigned to them from this screen.
Couriers
The Couriers tab holds your carriers with their delivery cutoff times — the cutoff safeguard warns you when an order won't make today's pickup. Each courier records a contact, cutoff time, operating days and a booking portal link. Add courier to set up a new one.
Ordering from suppliers and receiving stock in — including shelf-stock lines that update quantities and costs automatically.
Purchase Orders
Purchase Orders (FULFIL → Purchase Orders) tracks parts and consumables you buy from suppliers — most usefully your shelf stock reorders, where receiving a PO updates stock on hand and cost prices automatically.
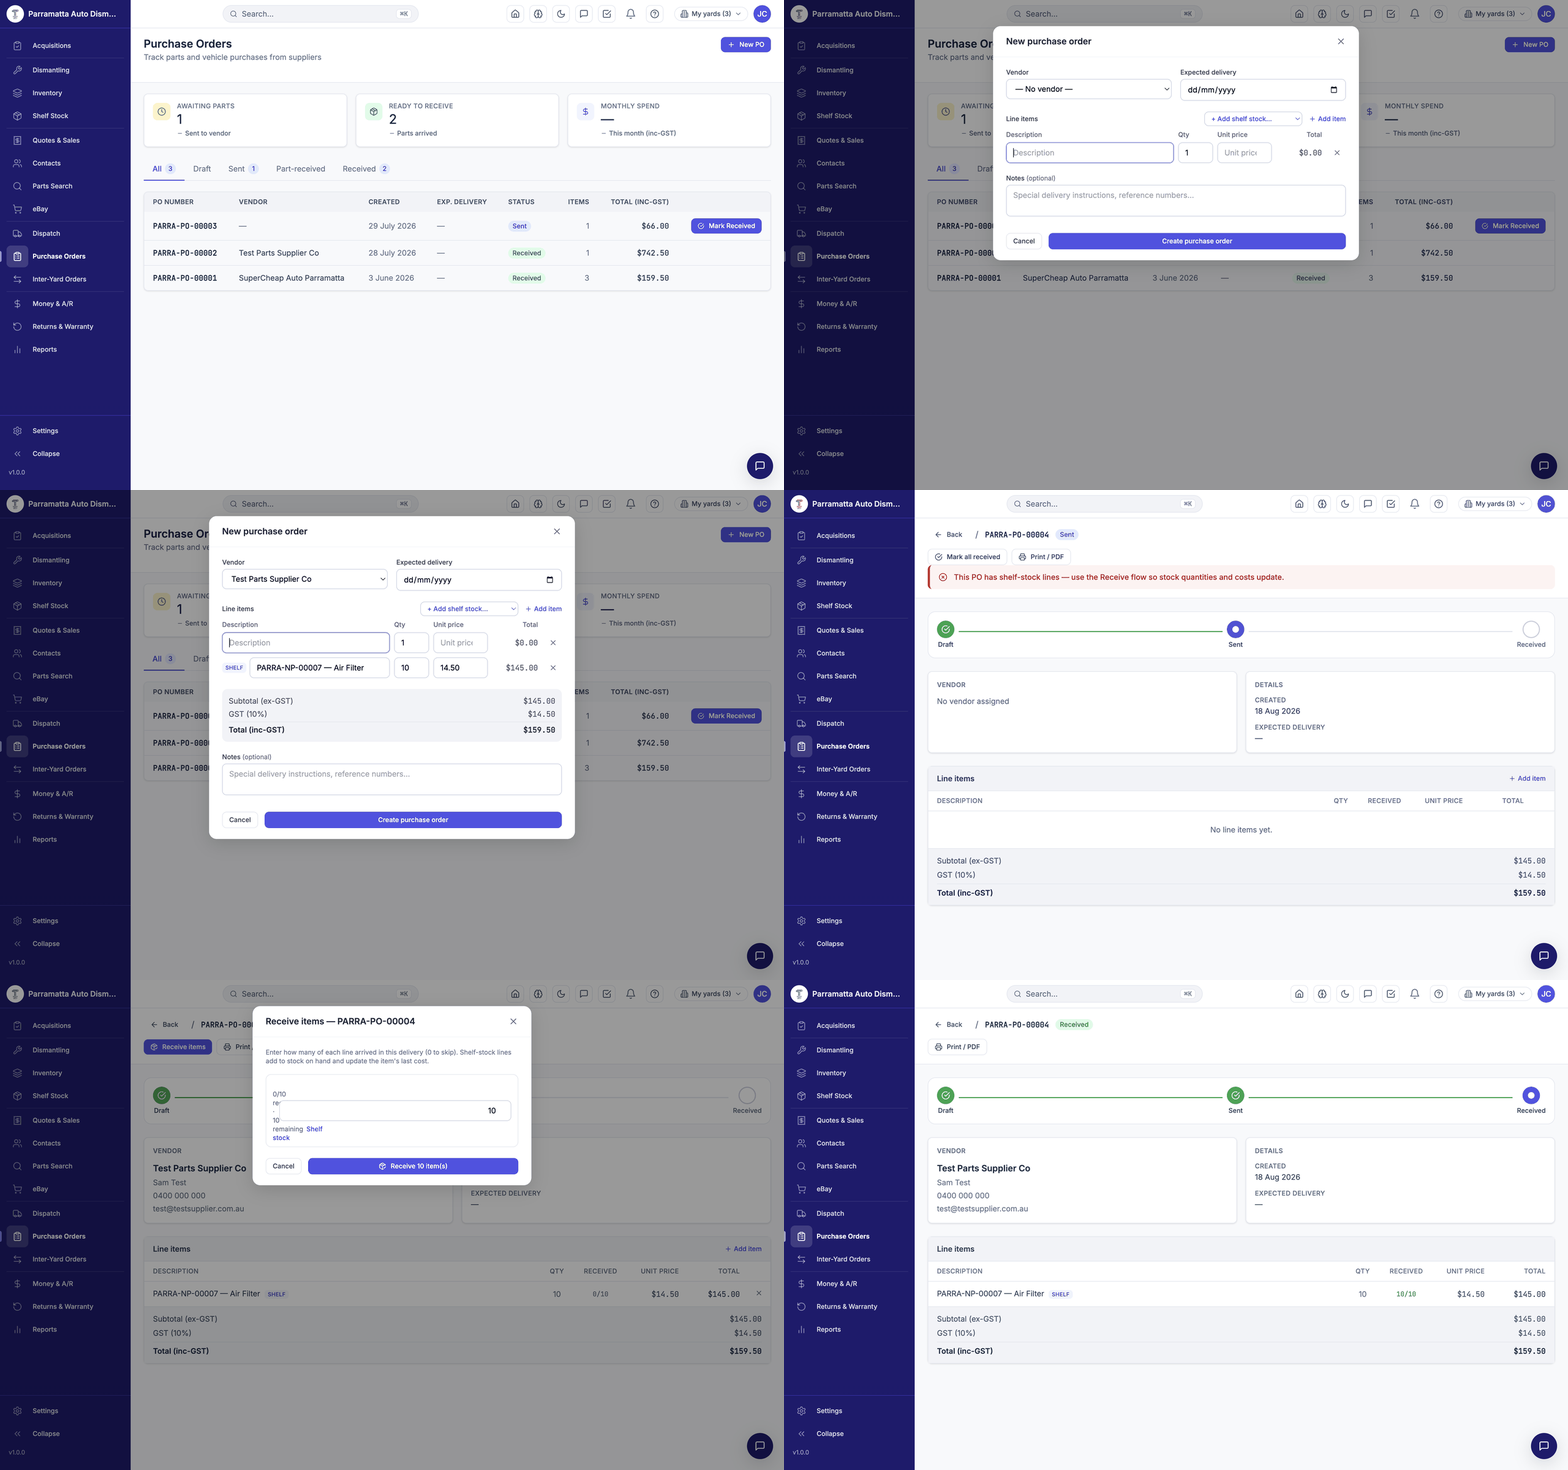 Walkthrough: the PO list, creating a PO with a shelf-stock line, sending it, and receiving stock in.
The page opens with three tiles — Awaiting parts (sent to vendor), Ready to receive (parts arrived) and Monthly spend (inc-GST) — and status tabs: All / Draft / Sent / Part-received / Received. PO numbers run YARD-PO-00001 and up.
Creating a purchase order
New PO
Click New PO. Pick the vendor (from Contacts → Vendors) and an expected delivery date if you know it.
Add lines
Two kinds of line:
- + Add shelf stock… — pick one of your shelf items. The quantity pre-fills from the item's reorder quantity and the price from its last cost, both editable.
- Add item — a free-text line with description, quantity and unit price, for anything not tracked as shelf stock.
Totals show ex-GST, GST (10%) and inc-GST as you go.
Create, then send
Create purchase order saves it as a Draft. When it goes to the supplier, open it and Mark as Sent — the stepper tracks Draft → Sent → Received. Print / PDF produces the document to email or hand over.
Receiving stock in
When a delivery arrives, open the PO and click Receive items:
- Enter how many of each line arrived in this delivery — 0 skips a line.
- Partial deliveries are fine: the PO sits at Part-received (each line shows e.g. 4/10 received) until the rest lands.
- Shelf-stock lines add to stock on hand and update the item's last cost the moment you receive them — no separate stock adjustment needed.
On a PO with shelf-stock lines, use the Receive flow rather than a blanket "mark received" — WreckMate guards this so quantities and costs always update through receiving. If you try to shortcut it, the PO tells you why not.
Where purchase orders fit
- Shelf stock reordering — the At / below reorder tile on Shelf Stock tells you what needs ordering; a PO with shelf lines closes the loop and keeps costs current.
- Vehicle purchases are usually recorded as Acquisitions instead — acquisitions carry the vehicle-specific costs (buyer's premium, towing) that feed vehicle profit-and-loss.
Ordering parts from other yards for your customers, and fulfilling the orders other yards place with you.
Inter-Yard Orders
An inter-yard order is how a network part becomes a sale: you order a part from another WreckMate yard for your customer, or another yard orders one of your parts for theirs. The Inter-Yard Orders page (FULFIL) has a tab for each side.
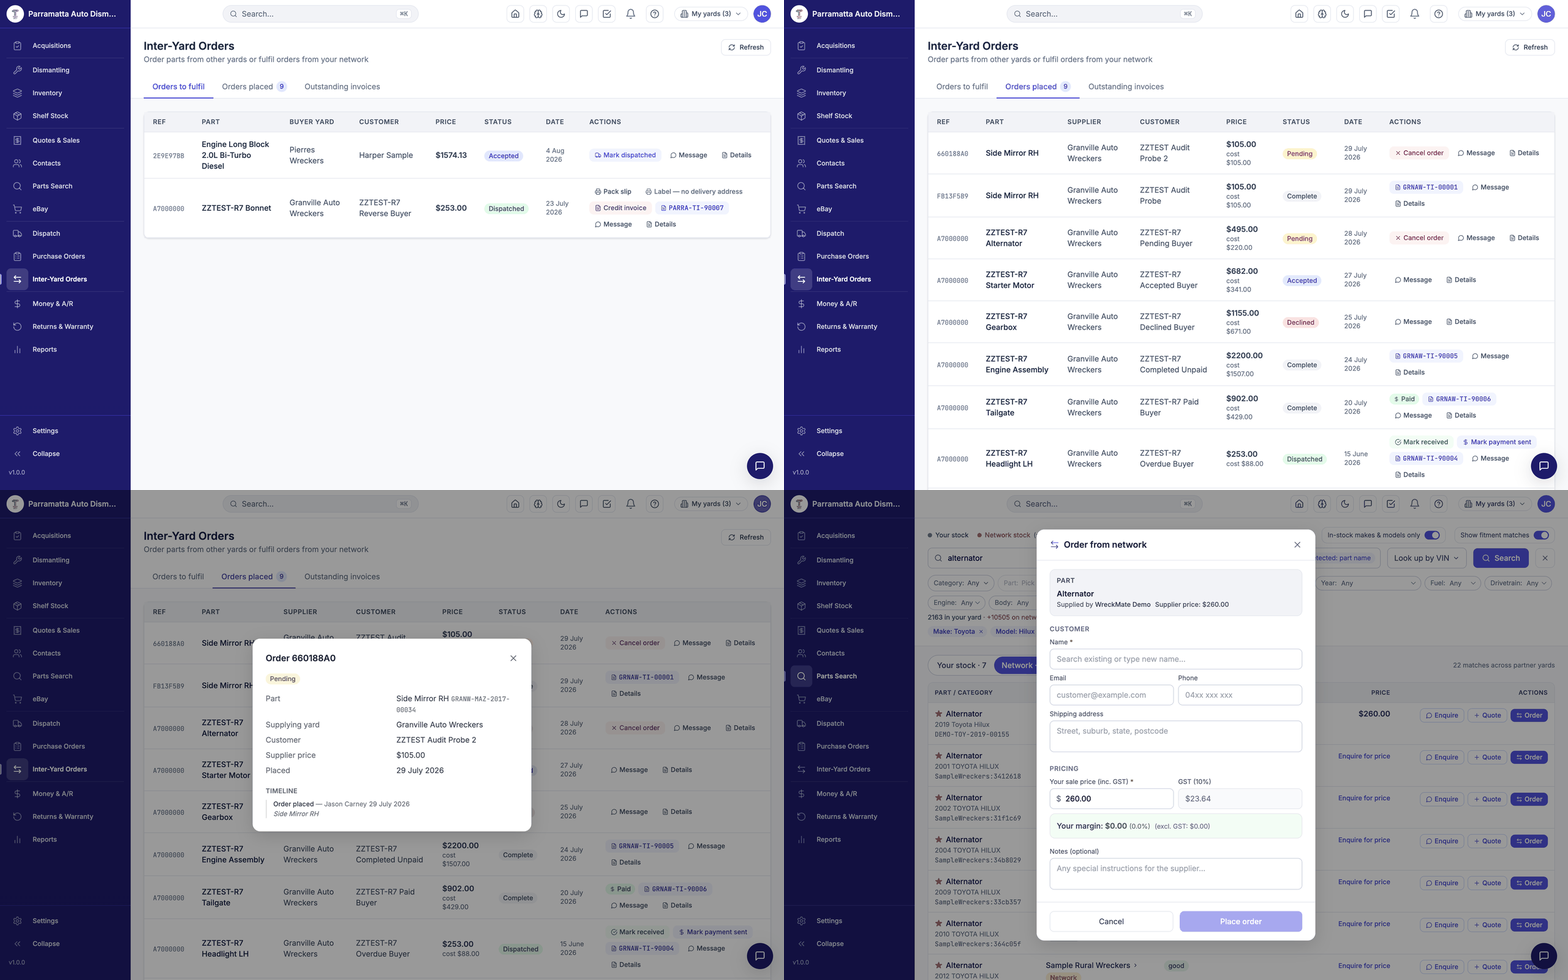 Walkthrough: orders to fulfil, orders placed, outstanding trade invoices, and placing an order from a network search result.
Placing an order (you're the buyer)
Start from a network result in Parts Search:
Click Order on the network row
The Order from network form opens showing the part, the supplying yard and their supplier price.
Enter your customer
Name (required), email, phone and the shipping address — this is where the part will be sent.
Set your sale price
Enter your sale price inc. GST to your customer. The form shows the GST component and your margin (and its percentage) live, so you can see exactly what you're making before you commit.
Place order
The order goes to the supplying yard to accept or decline. You'll find it under Orders placed.
Delivery is drop-ship: the supplying yard sends the part directly to your customer, with your yard's details on the paperwork. Your customer deals with you throughout.
Tracking an order you placed
The Orders placed tab shows each order's reference, part, supplier, your customer, price (with your cost beside it) and status:
- Pending — awaiting the supplier; you can still Cancel order.
- Dispatched — the supplier has shipped; click Mark received when your customer confirms arrival.
- Payment — after receipt, Mark payment sent when you've paid the supplier; they confirm and the order completes as Paid. Trade invoices (e.g.
GRNAW-TI-00001) link from the row.
Message opens the conversation with the supplying yard with the order attached; Details shows the part, listing SKU, supplying yard, customer, price and the full timeline of who did what, when.
Fulfilling an order (you're the supplier)
The Orders to fulfil tab lists orders other yards have placed on your stock — reference, part, buyer yard, their customer, your price and status:
- Accept or decline a pending order.
- Once accepted, pick and pack the part, then Mark dispatched — the row offers the pack slip and label (the label carries the buyer's customer's shipping address), plus your credit invoice to the buying yard.
- The buyer marks it received and sends payment; confirm payment when it lands and the order completes.
Inter-yard orders are fulfilled from this page — they deliberately don't appear on the Dispatch board, which is for your own customers' work orders.
Invoices
Every completed order produces a trade invoice between the yards, and the page shows an outstanding inter-yard invoices counter so nothing slips. The money side — who owes whom across all orders — rolls up in Money & A/R.
Daily reconciliation, receivables and statements, COD, Capricorn claims and your BAS figures — one money page.
Money & A/R
Money & A/R (FINANCE) is the money end of the day: reconcile the till, chase receivables, send statements, manage COD and Capricorn, and pull your BAS figures.
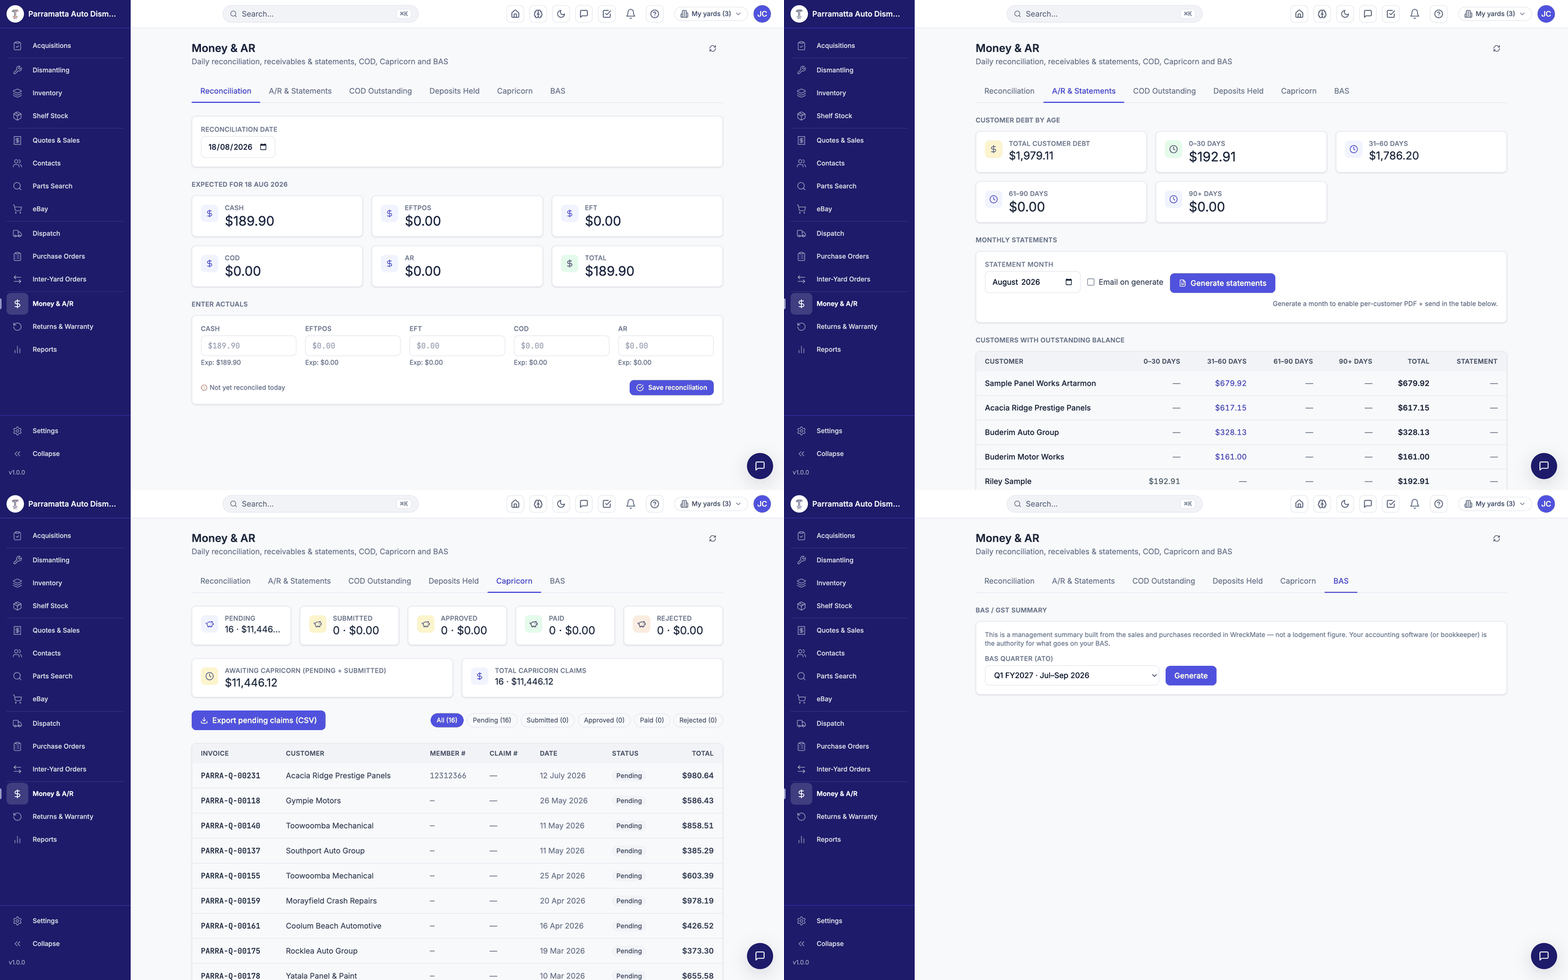 Walkthrough: daily reconciliation, aged A/R and statements, Capricorn claims and BAS.
Six tabs: Reconciliation · A/R & Statements · COD Outstanding · Deposits Held · Capricorn · BAS.
Daily reconciliation
The Reconciliation tab shows expected takings for the day by payment method — Cash, EFTPOS, EFT, COD and A/R — computed from the day's sales. Count the till, enter your actuals beside each expected figure, and Save reconciliation. Until you do, the day shows Not yet reconciled today.
Any gap between expected and actual is visible the day it happens, not at month end.
Afterpay and Zip sales are treated as cash-like — they settle at the time of sale, so they never appear as customer debt.
A/R & Statements
The receivables tab opens with customer debt by age — totals for 0–30, 31–60, 61–90 and 90+ days — then the table of customers with outstanding balances, each broken down by the same ageing buckets.
Monthly statements
- Pick the statement month and click Generate statements (tick Email on generate to send them in the same step).
- Once a month is generated, each customer row offers a per-customer PDF and a send action.
A customer's balance here is their true A/R position — what they actually owe across invoices, payments and credits, not just the value of open paperwork.
COD Outstanding and Deposits Held
- COD Outstanding — sales dispatched cash-on-delivery that haven't been collected yet, so drivers' collections can be chased and reconciled.
- Deposits Held — customer deposits taken against quotes that haven't yet completed.
Capricorn
Capricorn sales are trade claims, not customer debt — they're excluded from customer A/R and handled on their own tab. Export produces a Capricorn-format CSV of all pending claims and marks them submitted in one step; an individual claim's status is managed from its sale.
BAS
The BAS tab summarises GST collected and paid for your reporting period, computed from WreckMate's own ledger — the figures you (or your bookkeeper) need when lodging. GST in WreckMate is always the Australian 10%, itemised on every quote and invoice.
If you connect Xero or MYOB under Settings → Integrations, invoices sync to your accounting package — but the BAS tab works from WreckMate's ledger either way.
Issuing a Return Authorisation, the inspection workflow, restocking, and how credits are applied.
Returns & Warranty
Returns & Warranty (FINANCE) handles everything that comes back: returns, warranty claims and exchanges, each tracked as a Return Authorisation (RA) with a clear status flow and a permanent timeline.
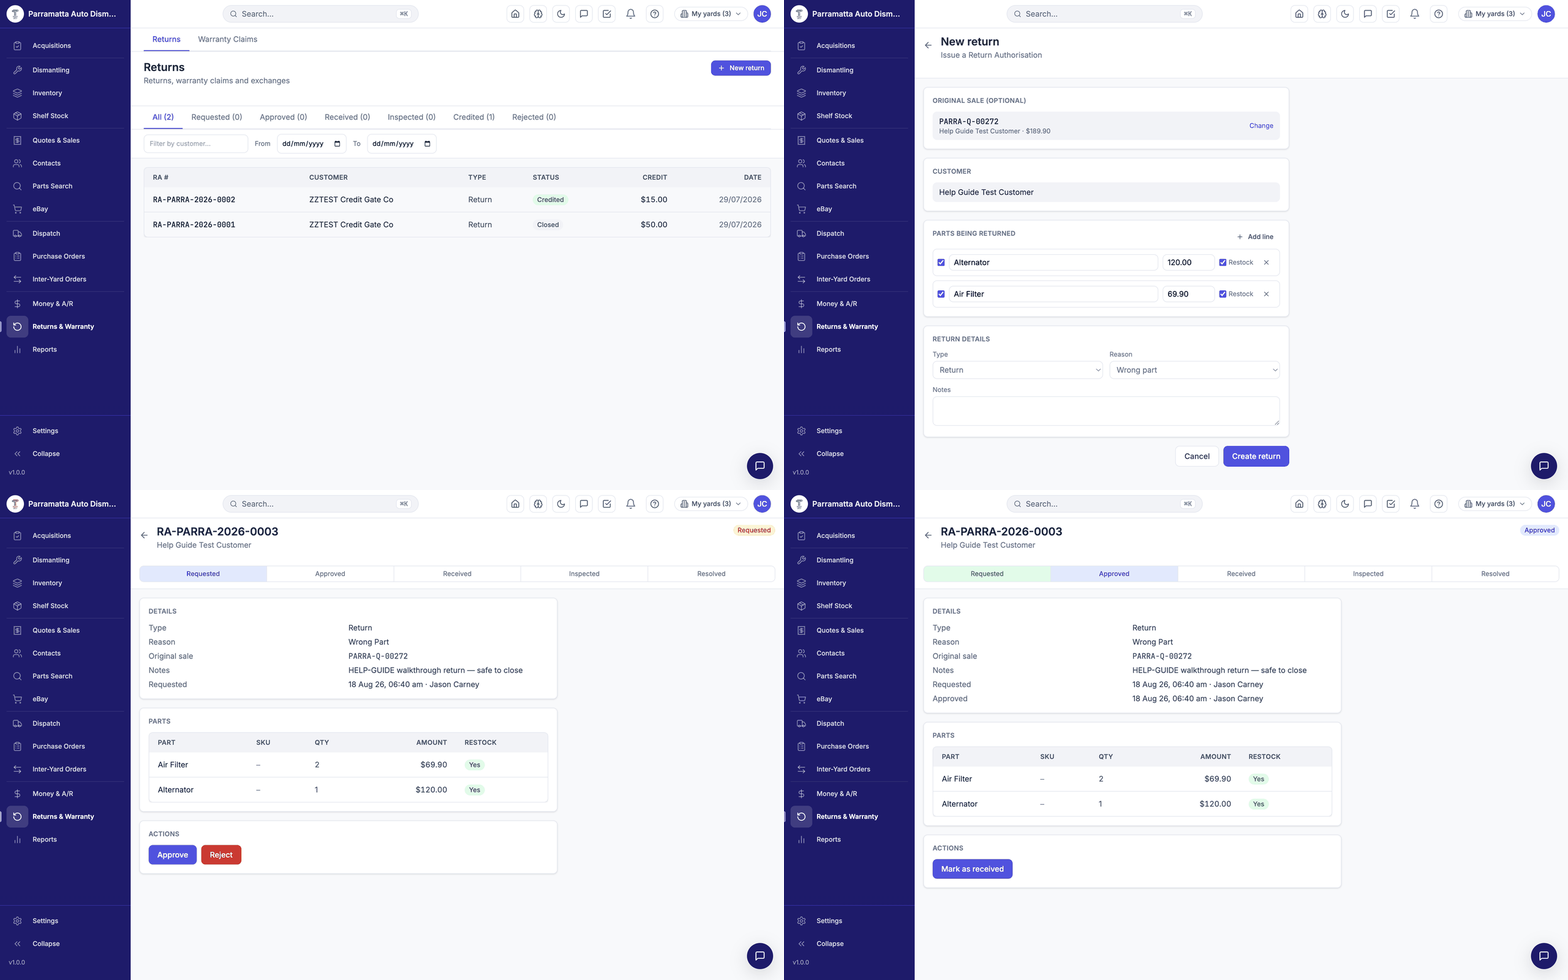 Walkthrough: the returns list, raising an RA from a sale, and approving it.
The page has Returns and Warranty Claims tabs, status filters — All / Requested / Approved / Received / Inspected / Credited / Rejected — and a date range. RA numbers run RA-YARD-2026-0001 and up.
The RA lifecycle
Requested → Approved → Received → Inspected → Resolved- Requested — the RA exists; nothing has moved yet.
- Approved — you've agreed to take the part back (or Rejected ends it here).
- Received — the part is physically back at the yard.
- Inspected — condition confirmed against the claim.
- Resolved — credited (with the credit amount recorded) or closed.
Every step is stamped with who and when on the RA's timeline.
Raising a return
The fastest path starts from the sale itself:
Open the sold quote and click Request return
On any sold sale in Quotes & Sales, Request return opens the RA form with the sale, customer and its line items pre-filled.
Choose the parts coming back
Each line has a Restock choice — tick it if the part is going back on the shelf as available stock, untick for parts that are scrap or disputed.
Type and reason
Type: Return, Warranty claim or Exchange. Reason: Wrong part, Faulty, No longer needed, Damaged in transit, Warranty, or Other. Add notes for the inspector.
Create return
The RA is created as Requested, numbered, and appears in the returns list.
You can also start from New return on the Returns page and link the original sale by searching its invoice/quote number — or raise an RA with free-text part lines when there's no linked sale.
Processing an RA
Open the RA to see the parts, amounts, restock flags, the linked sale, and the timeline. Work it with the action buttons: Approve (or Reject), then mark received, record the inspection, and resolve with the credit amount.
A credit nets against the original sale — the invoice you issued stays intact, and the credit is recorded against it. Reports and the customer's balance show the sale and its credit side by side, which is exactly what your accountant (and a warranty audit) wants to see.
Warranty basics
Parts sold through WreckMate carry the warranty period shown on their quote line (90-day is typical). A claim inside the warranty window is raised the same way with type Warranty claim — the RA form and lifecycle are identical, so your staff learn one process.
Every report type, date ranges and exports — including the NSW statutory registers.
Reports Overview
WreckMate's reports give you a clear picture of your yard — what's selling, what's ageing, which vehicles made money — plus the statutory registers NSW dismantlers must keep. Go to Reports (FINANCE) in the left menu.
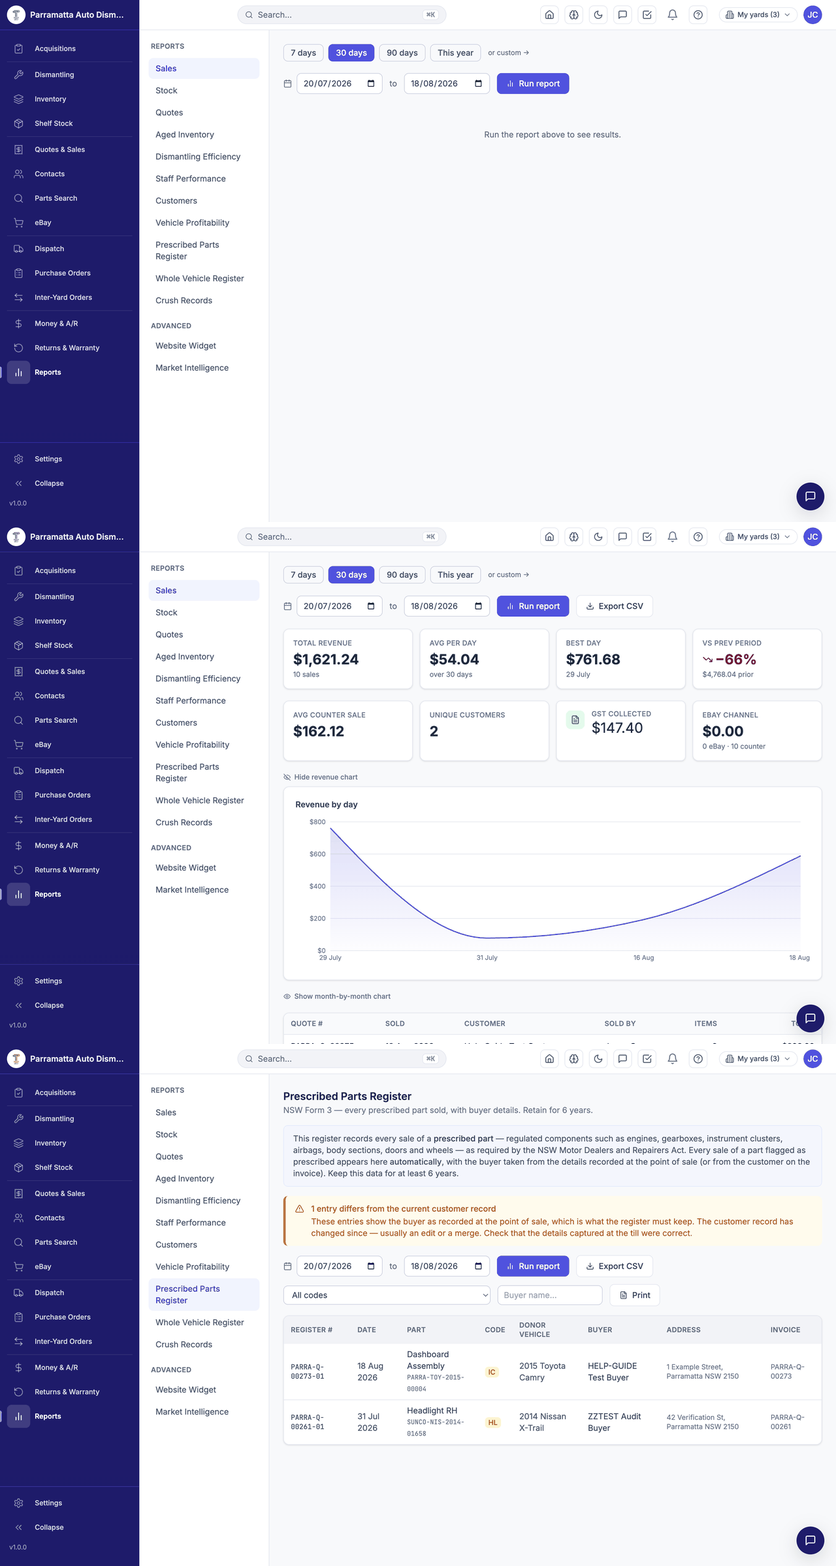 Walkthrough: the report index, a sales report with its revenue chart, and the Prescribed Parts Register.
Running a report
- Pick a report type from the index.
- Choose a date range — 7 days, 30 days, 90 days, This year, or a custom from/to.
- Click Run report.
Every report offers Export CSV and Print once it's run.
Report types
| Report | What it shows |
|---|---|
| Sales | Revenue, sales count, averages, best day, vs previous period, GST collected, eBay vs counter channel split, revenue-by-day chart, and every sale with who sold it |
| Stock | Current inventory position |
| Quotes | Quote volume and conversion |
| Aged Inventory | What's been sitting unsold, by age |
| Dismantling Efficiency | How fast donors move through the pipeline |
| Staff Performance | Activity and sales by staff member |
| Customers | Your customer base and their buying |
| Vehicle Profitability | Cost vs recovery per donor vehicle |
| Prescribed Parts Register | Statutory — see below |
| Whole Vehicle Register | Statutory — see below |
| Crush Records | Statutory — see below |
Under Advanced: Website Widget (traffic and enquiries from your website stock widget) and Market Intelligence (demand and pricing signals).
The statutory registers
These are the regulated registers NSW auto dismantlers are required to keep — WreckMate builds them automatically from your normal workflow, so compliance is a by-product of using the system rather than separate paperwork:
- Prescribed Parts Register — NSW Form 3: every prescribed part sold, with buyer details. Prescribed parts are the regulated components — engines, gearboxes, instrument clusters, airbags, body sections, doors, wheels and so on — and each carries its register code on the part record. Retain for 6 years.
- Whole Vehicle Register — every vehicle acquired, with its identifying details (including registration plates recorded at intake).
- Crush Records — every vehicle destroyed, with method and date, alongside the Certificates of Destruction issued from the dismantling card.
The registers are only as complete as the data behind them — record plates at donor registration and buyer details at sale, and the registers write themselves.
Dashboard vs Reports
The Dashboard is the live snapshot — today's quotes and invoices, stock counts, alerts — updating as the day happens. Reports are the deeper, date-ranged analysis for weekly or monthly review and export.
Common questions
Why are margins showing as $0? Acquisition costs haven't been entered for some donor vehicles — parts from vehicles without an acquisition record carry no cost, which makes recovery look artificially good. Check Acquisitions for vehicles missing cost data.
Do report totals match my accounting package? WreckMate records a sale when it happens; a connected Xero/MYOB shows it after the sync runs. Compare like-for-like periods after syncs complete.
Can I see sales by staff member? Yes — the Sales report lists every sale with who sold it, and the Staff Performance report aggregates by person.
Revenue, sale counts, channel split and GST collected for any period — with CSV export.
Sales Report
The Sales report shows what your yard earned in a period, how that compares to the one before, and every sale behind the numbers. Run it from FINANCE → Reports: pick Sales, choose a range (7 days, 30 days, 90 days, This year, or a custom from–to), and click Run report.
The summary tiles
| Tile | What it shows |
|---|---|
| Revenue | Total sales value for the period, with the sale count |
| Avg per day | Revenue averaged across the period |
| Best day | The single strongest day |
| Vs prev period | Percentage change against the equivalent prior window |
| Avg counter sale | Average value of a counter sale |
| Unique customers | How many different customers bought |
| GST collected | The GST portion of the period's sales — your BAS 1A cross-check |
| eBay channel | eBay revenue split out, with eBay vs counter sale counts |
Charts and the sales table
The Revenue by day chart maps the period's rhythm (toggle a month-by-month view for longer ranges). Below it, the sales table lists every sale — quote #, sold date, customer, sold by (the staff member), items and total. Click through any row to the quote/invoice.
Exporting
Export CSV downloads the report for Excel, your accountant, or BAS working papers; Print produces a clean print layout. Set the range first — the export honours the filters you ran.
For the tax-period view with the GST math done — sales, purchases and the difference — use the BAS tab on Money & A/R. The Sales report's GST tile is the quick cross-check, not the lodgement figure.
What's on the shelves right now — counts, value, and the aged stock that needs a decision.
Stock Report
The Stock report is a snapshot of your inventory — how many parts, what they're worth, and how long they've been sitting. Run it from FINANCE → Reports: pick Stock, set the range where relevant, and click Run report. (Its sibling, Aged Inventory, focuses entirely on the slow end of the shelf.)
What it shows
- Stock counts and value — available parts and their total value at selling price. Remember that selling price is not book value; your accountant will value inventory at cost or net realisable value.
- Breakdown by category and make — where your stock is concentrated. If 40% of your shelf is one make, that's your specialisation, planned or not.
- Unpriced and unlocated stock — parts that can't sell because search can't surface them properly. The dashboard's low-stock and needs-locations widgets track the same problems day-to-day.
Working aged stock
Old stock ties up space and unrecovered cost. Age is measured from acquisition — when the donor arrived, not when the part row was created — so a freshly ticked part from a year-old donor correctly reads as old.
Check the price
Compare against the network and eBay. If you're well above market, that's usually the whole story — adjust and watch it move.
Check visibility
No price, no location, no photos = hard to find and harder to trust. Fix the record before discounting the part.
Put it on eBay
National demand beats local demand for slow movers — one photo makes a part listable, three make it sell. See eBay.
Discount or scrap
For genuinely dead stock, a hard discount or a scrap decision beats another year of shelf space.
Exporting
Export CSV gives you the full list — SKU, part, donor, condition, price, location, age — ready for a bulk price review in Excel; Print for a hard copy. Comparing this month's export against last month's is the simplest stock-movement tracker there is.
Finding your way around Settings — seven categories, each with its own sub-pages.
Settings Overview
Everything configurable about your yard lives under Settings, at the bottom of the left-hand menu. Settings is organised as a category rail down the left side — seven categories, each opening its own set of sub-pages.
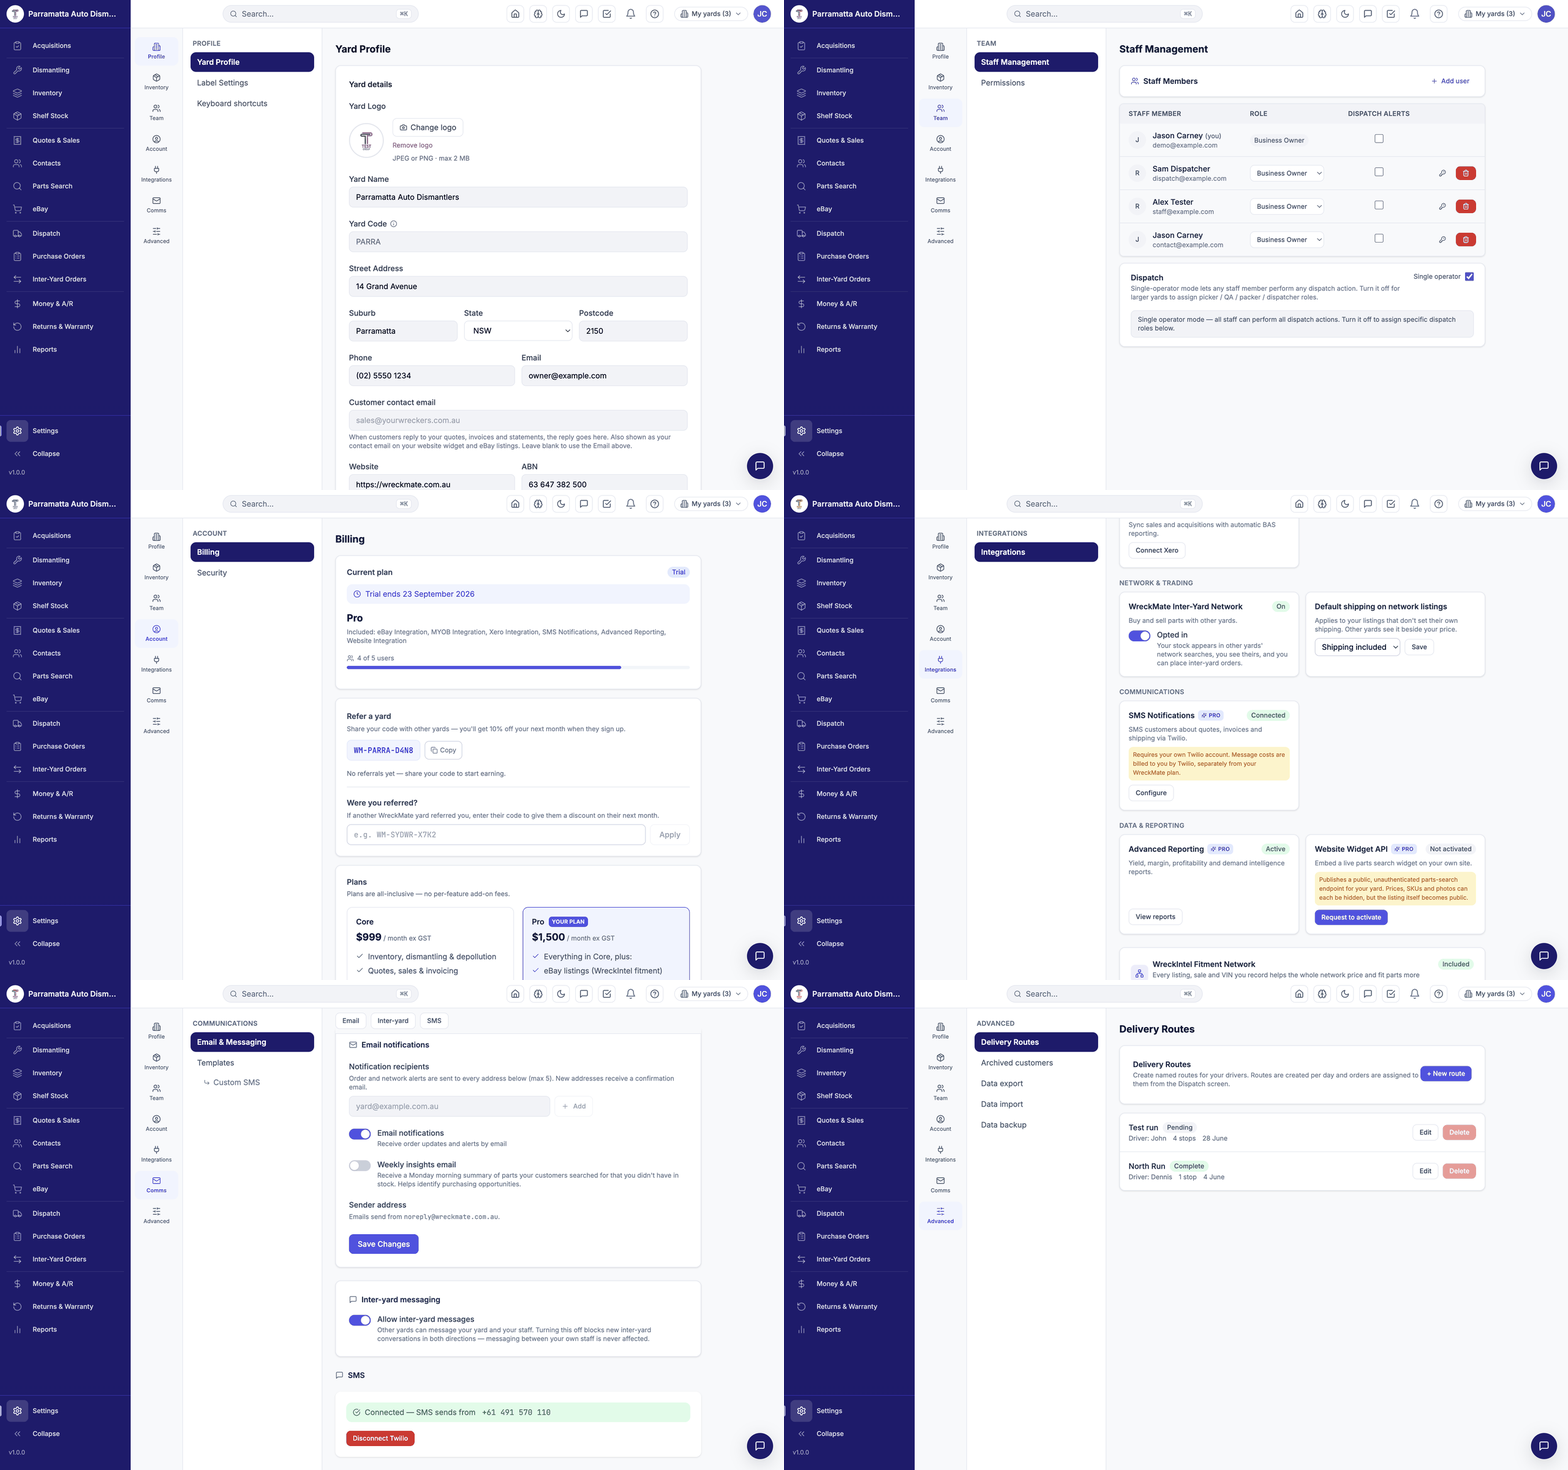 Walkthrough: Profile, Inventory, Delivery Routes, Team, Account, Integrations (including the SMS/Twilio card), Comms with SMS template previews, and Advanced.
The seven categories
| Category | Sub-pages | What lives there |
|---|---|---|
| Profile | Yard Profile · Label Settings | Your trading details, ABN, yard code, logo, contact emails, label printing. See Yard Profile. |
| Inventory | Categories · Dismantling Templates · Compliance (Prescribed Parts) | The part-category taxonomy, per-body-style dismantling checklists, and NSW prescribed-parts compliance settings. |
| Team | Staff Management · Permissions | Your staff, their roles, and the per-role permission matrix. See Team & Roles. |
| Account | Billing · Security | Your plan and trial status, users included, referral code, and security options. |
| Integrations | — | eBay, Xero, MYOB, SMS (Twilio), advanced reporting, the website widget, and network preferences. See Integrations. |
| Comms | Email & Messaging · Templates · Custom SMS | Notification recipients, the weekly insights email, inter-yard messaging, and every email/SMS template. See Communications. |
| Advanced | Delivery Routes · Archived customers · Data export · Data import · Data backup | Driver routes for local deliveries, archived customer records, and your data in/out. See Data Import. |
A Keyboard shortcuts link sits at the top of Settings — the same list is also under the Help (?) menu anywhere in the app.
Things worth knowing
- Categories (under Inventory) is the taxonomy your parts are organised into across the network. Parts are auto-categorised from their name, and changing a category never hides a part — you can reassign an individual part at any time from its edit screen.
- Dismantling Templates control which parts appear on a new dismantling card for each body style — and you can maintain your own yard-specific template that overrides the default. Edits affect new cards only.
- Billing (under Account) shows your current plan, trial end date, user count, and your referral code — share it with another yard and you'll get a discount on your next month when they sign up.
- Data export (under Advanced) gives you a full export of your yard's data at any time — it's your data.
- Delivery Routes (under Advanced) are named driver runs; orders are assigned to them from the Dispatch screen.
Your yard's name, ABN, contact information, yard code, logo and business details.
Yard Profile
The Yard Profile is the source of truth for your business details in WreckMate. Information entered here appears on every invoice, quote, and customer communication your yard generates.
Go to Settings → Profile → Yard Profile to manage these settings.
Essential settings
Yard logo
Upload your logo (JPEG or PNG, max 2 MB). It appears in the app header, and on your branded documents and emails. Use Change logo / Remove logo to update it.
Yard name
Your trading name — the name you do business under. This appears on invoices, quotes, and in the WreckMate network.
Yard code
A short code that becomes the prefix for all your part SKUs.
Example: BNEAP → all your parts have SKUs like BNEAP-TOY-2019-00342
The yard code cannot be changed after creation. Choose carefully — this code will be on every label you ever print. Most yards use a 4–6 letter abbreviation of their trading name.
ABN
Your Australian Business Number. Required for GST compliance — it appears on every tax invoice.
Address and phone
Your yard's physical address and main business phone. Both appear on invoices, and the network uses your location when other yards look you up.
Email and Customer contact email
- Email — your main business email address.
- Customer contact email — when customers reply to your quotes, invoices and statements, the reply goes here. It's also shown as your contact email on your website widget and eBay listings. Leave it blank to use the main Email above.
Outgoing emails are sent from noreply@wreckmate.com.au with your yard's branding; replies go to your Customer contact email. See Communications.
Website
Your yard's website URL, shown to customers on documents where relevant.
Acquisition options
Add your own entries to the Source and Condition dropdowns used on the Acquisitions page — useful if you buy from a local auction house that isn't in the built-in list. Built-in options always remain available.
Label settings
The Label Settings sub-page (under the Profile category) controls your part-label printing — printer type and label layout. Labels carry the part's SKU; remember a printed SKU never changes.
Invoice branding
Your logo and document styling on quotes, invoices and statements are managed under Settings → Comms → Templates → Invoice Branding. See Communications.
Changing settings
Most Yard Profile settings can be changed at any time — changes take effect on all new documents immediately (existing issued invoices are not retroactively updated). The exception is the Yard Code, which is fixed once created.
Only senior roles (Business Owner, Administrator) can change yard-level settings. If a staff member needs a change they can't make, ask your Business Owner or Administrator.
Adding staff, understanding each role, and managing per-role permissions for your yard.
Team & Roles
WreckMate uses a role-based access system so each staff member sees only what they need to do their job. A dismantler on the yard floor doesn't need access to billing; a sales rep doesn't need to see acquisition costs.
Go to Settings → Team — it has two sub-pages: Staff Management and Permissions.
Adding a staff member
Go to Settings → Team → Staff Management
You'll see your current team, each person's role, and their dispatch-alert setting.
Click Add user
Enter the staff member's email address and select their role from the dropdown.
They set up their own login
The staff member receives an email with a link to set up their account. Their role is fixed at invitation (you can change it later), and they can log in as soon as they've completed sign-up.
Roles explained
WreckMate ships with seven default roles:
| Role | Best for |
|---|---|
| Sales rep | Counter sales, phone sales, quotes and customer service |
| Dispatch | Picking, packing, shipping — the work-order pipeline |
| Accountant | Invoicing, reports, statements, accounting sync |
| General Manager | Day-to-day oversight with broad access |
| Administrator | Full operational access, except billing |
| Business Owner | Everything, including billing and role changes |
| Hybrid | A flexible mix — tune exactly what it can see under Permissions |
Each role's access is a set of per-module grants — none / view / full — across the app's modules (inventory, dismantling, quotes, customers, invoicing, reports, eBay, dispatch, and so on).
The Permissions sub-page
Settings → Team → Permissions shows the live grant matrix for every role and lets senior roles adjust it. This page is the authoritative picture of who can do what at your yard — the defaults are a starting point, not a straitjacket.
Rather than granting one person a bigger role than they need, use the Hybrid role and tune its grants — or adjust a role's grants for your whole yard.
Business Owner rules
- The person who created the yard is automatically a Business Owner
- Only a Business Owner can assign the Business Owner role to someone else
- No one can change their own role, and no one can remove themselves — so you can't lock yourself out
Dispatch alerts
The Dispatch alerts column on Staff Management controls who gets notified when orders are ready to pick or dispatch — typically your Dispatch-role staff and whoever runs the counter.
Changing a role or removing someone
Both are done from Staff Management:
- Change role — edit the role dropdown next to their name. The change takes effect on their next page load.
- Remove — they lose access immediately, including their sign-in. Their history (parts added, quotes created, sales made) remains in the system for your records.
Removing a staff member never deletes their work — it only prevents them logging in from that point on.
User limits
Your plan includes a set number of user accounts — the current usage is shown in Settings → Account → Billing (e.g. "4 of 5 users"). If you've hit the limit, talk to us about your plan before adding more staff.
Connecting eBay, Xero, MYOB, SMS via Twilio, the website widget and network preferences.
Integrations
Settings → Integrations is where WreckMate connects to the tools you already use. Pro features are included in your Pro plan — there are no per-feature add-on fees.
Each integration is a card with its current status (Connected / Not connected / Active) and a Configure or Connect button.
Some integrations require an activation approval before your yard can connect them for the first time. If you see a "request activation" step instead of a Connect button, submit the request — the WreckMate team reviews and approves it, and the card unlocks.
Marketplace & Sales
eBay PRO
List parts and sync sales with your eBay store. See the full guide: Selling on eBay.
eBay requires a paid seller subscription for third-party listing tools — an eBay Pro Basic plan, roughly $24.95/month, paid directly to eBay. You'll be asked to acknowledge this when requesting activation.
The eBay card's Configure page also holds the go-live checklist (seller policy IDs, test listing, webhook verification, listing template) and the Switch to production control for moving from the sandbox to your live eBay account.
Accounting
Xero PRO and MYOB
Sync sales and invoices to your accounting package. Connecting takes you through the provider's own sign-in and consent screen; once connected, sold quotes can be pushed manually, in a daily batch, or automatically at the point of sale depending on your sync mode.
Communications
SMS Notifications (Twilio)
Text customers about quotes, invoices and shipping.
SMS uses your own Twilio account — message costs are billed to you by Twilio, separately from your WreckMate plan. WreckMate never adds a per-message charge.
To connect:
Create a Twilio account
Sign up at twilio.com, buy an Australian mobile number, and note your Account SID and Auth Token (or create an API key).
Configure the SMS card
Click Configure on the SMS Notifications card. Enter your Account SID and Auth Token (or API key), and the Twilio number to send from. Credentials are stored encrypted.
Check the connection
Under Settings → Comms, the SMS section shows "Connected — SMS sends from +61…" with your number. A Disconnect Twilio button is there if you ever need to unlink it.
Once connected, the SMS actions light up across the app — quote sends, invoice notifications, shipping updates and payment reminders — using the editable SMS templates.
Data & Reporting
Advanced Reporting PRO
Yield, margin, profitability and demand intelligence reports — once active, they appear under Reports.
Website Widget API PRO
Show your live stock on your own website. The widget must be enabled before your stock is published, and an API key raises the request rate limit for busier sites.
Network
Your inter-yard network preferences also live here:
- Network participation — opt in to see other yards' stock and let them see yours (with orders and messaging both directions).
- Default shipping on network listings — Not stated, Shipping included, or Shipping extra. This applies to your listings that don't set their own shipping; other yards see it beside your price.
Who can manage integrations
Connecting and disconnecting integrations is restricted to senior roles. Disconnecting is always available once connected — even if an integration's activation is later revoked, you can still unlink accounts and take public listings down.
Email and SMS settings — notification recipients, the weekly insights email, and every message template.
Communications
Settings → Comms controls everything WreckMate sends on your behalf — email, SMS, and inter-yard messaging. It has three sub-pages: Email & Messaging, Templates, and Custom SMS.
Email & Messaging
Notification recipients
Order and network alerts are sent to every address you list here (up to 5). New addresses receive a confirmation email before they start getting alerts.
Email notifications
The master toggle for receiving order updates and alerts by email.
Weekly insights email
An opt-in Monday-morning summary of parts your customers searched for that you didn't have in stock — a shopping list for your next auction run. (Pro feature.)
Sender address
Emails send from noreply@wreckmate.com.au, carrying your yard's name and logo. When a customer replies, the reply goes to your Customer contact email (set in Yard Profile).
Inter-yard messaging
Controls whether other yards can message your yard. Turning this off blocks new inter-yard conversations in both directions — messaging between your own staff is never affected.
SMS
Shows your SMS connection status — once Twilio is connected it reads "Connected — SMS sends from +61…" with your sending number, and offers Disconnect Twilio. Setting it up is covered in Integrations.
Templates
Every automated message has an editable template with three controls: Default (the built-in wording), Preview, and Edit.
Email templates
- Quote sent to customer
- Invoice sent to customer
- Payment reminder
- eBay sale confirmation
SMS templates
- Quote sent (SMS)
- Invoice sent (SMS)
- Shipping notification (SMS)
- Payment reminder (SMS)
Preview shows the message rendered with sample data, plus a character count — useful for SMS, where length affects cost:
Hi John Smith, your quote SYDWR-Q-00001 from Sydney Wreckers is ready. Total: $1,250.00 inc GST. Valid until 30 Jun 2026.
Previews use sample values — real messages substitute your actual customer, quote and yard details automatically.
Keep SMS templates under 160 characters where you can — the preview's character count tells you exactly where you stand.
Invoice Branding
The Templates page also holds Invoice Branding — the logo and styling applied to your quote, invoice and statement PDFs.
Custom SMS
For one-off messages outside the templated flows — for example, letting a customer know an unusual part has arrived. Ad-hoc SMS uses the same Twilio connection and appears in the customer's history.
Where messages actually get sent from
- Email goes via WreckMate's mail service — you don't need to configure anything beyond your Customer contact email.
- SMS goes via your own Twilio account (set up here) — if Twilio isn't connected, SMS actions are simply unavailable and nothing is sent.
Importing your existing inventory via CSV, template format, field mapping, and what happens after import.
Importing Inventory
If you're switching to WreckMate from another system — or have existing stock recorded in a spreadsheet — you can import it all at once via a CSV file. You don't need to enter every part manually.
Go to Settings → Advanced → Data import to access the import tool. (The same Advanced category also holds Data export — a full export of your yard's data at any time — and Data backup.)
Before you start
What can be imported:
- Parts with condition, price, and vehicle details
- OEM numbers and notes
- Donor vehicle information (linked to parts)
What can't be imported:
- Sales history or invoices from another system
- Customer records (add customers manually or as you quote them)
- Photos (add photos to individual parts after import)
File size: WreckMate supports imports of up to 20,000 rows. For larger datasets, split into multiple files and import in batches.
Step 1: Download the template
- Go to Settings → Advanced → Data import
- Click Download Template
The template is a CSV file with the correct column headers. Open it in Excel, Google Sheets, or any spreadsheet application.
Template columns
Fill in the template with your existing data. Column descriptions:
| Column | Required | Description |
|---|---|---|
part_name | Yes | The part name (e.g. "Left Headlight Assembly") |
condition | Yes | A, B, or C |
price | Yes | Selling price excluding GST (e.g. 165.00) |
make | Yes | Vehicle make (e.g. Toyota) |
model | Yes | Vehicle model (e.g. HiLux) |
year | Yes | Year of donor vehicle (e.g. 2019) |
vin | No | VIN of donor vehicle (recommended) |
donor_location | No | Yard location of donor vehicle |
oem_number | No | Manufacturer's part number |
notes | No | Internal notes visible to staff |
acquisition_cost | No | What you paid for the donor vehicle |
acquisition_source | No | Where you bought it (e.g. Graysonline) |
acquisition_date | No | Purchase date (format: DD/MM/YYYY) |
Minimum viable row:
Front Bumper Bar,A,220.00,Toyota,HiLux,2018Full row example:
Left Headlight Assembly,B,185.00,Ford,Ranger,2017,6FPAAAJJ5HE123456,"Row 3 Bay 4",4V2RH-18B089-AB,"Minor UV haze on lens",4500.00,Graysonline,15/03/2023Step 2: Prepare your data
Before importing, review your data for these common issues:
Condition must be A, B, or C only. If your current system uses different grading (e.g. 1–5 stars, or Excellent/Good/Fair), map them to A/B/C before importing:
- Excellent / Like New → A
- Good / Minor wear → B
- Damaged / High wear → C
Prices must be numbers without currency symbols. 220.00 is correct. $220.00 will fail.
Year must be a four-digit number. 2019 is correct. 19 will not match.
Make and model must match WreckMate's catalogue. If WreckMate doesn't recognise the make/model combination, it will flag the rows in the preview. The most common mismatches are:
- "Landcruiser" vs "Land Cruiser" (use "Land Cruiser")
- "Commodore VF" vs "Commodore" + year (split into model + year fields)
- Brand abbreviations ("Merc" should be "Mercedes-Benz")
Step 3: Preview the import
Upload your CSV
Go to Settings → Advanced → Data import, click Choose File, and select your prepared CSV.
Review the preview
WreckMate shows a preview of the first 10 rows and flags any issues:
- Green rows — ready to import
- Yellow rows — imported with warnings (e.g. make/model partially matched)
- Red rows — errors that will prevent import (e.g. missing required field)
Fix errors if needed
Download the error report if there are red rows. Fix the issues in your CSV and re-upload. You don't need to remove the good rows — just fix the problematic ones and the whole file re-processes.
Step 4: Run the import
Once the preview shows no red rows:
- Click Run Import
- WreckMate processes all rows in the background
- A progress bar shows the import status
- When complete, WreckMate shows the final counts:
- Rows imported successfully
- Rows skipped (duplicates or unresolvable errors)
- New donor vehicles created
- Total parts added to inventory
Large imports (10,000+ rows) can take a few minutes. You can continue using WreckMate while the import runs.
What happens after import
After the import completes:
Parts are in your inventory but they don't yet have:
- Photos (add these to individual parts via each donor's parts list on the Inventory page)
- Labels printed (print from each part's detail page)
- Dismantling cards (not created for imported parts — these represent existing stock, not vehicles to be dismantled)
Donor vehicles are created from unique VIN/make/model/year combinations in your data. If multiple parts share the same VIN, they're all linked to the same donor.
SKUs are assigned to every imported part using your yard code and sequential numbering, continuing from your current highest sequence number.
Parts are immediately searchable — imported parts with a price and condition grade appear in parts search and are visible in the network right away.
Importing from Hollander (Pinnacle)
If you're currently using Hollander Pinnacle Professional, WreckMate has a dedicated migration tool that brings your vehicle and parts data across — vehicles first, then their parts, preserving your data as it was recorded. Contact support@wreckmate.com.au and we'll run the migration with you; it's a guided process with a dry-run preview before anything is written.
Grades from other systems map onto WreckMate's condition scale — if your data uses A/B/C, those arrive as Good/Fair/Poor on the imported parts.
Common import errors
| Error | Cause | Fix |
|---|---|---|
| "Make not recognised" | Make name doesn't match catalogue | Check spelling — try "Toyota" not "TOYOTA" |
| "Price must be a number" | Price has $ or comma | Remove formatting — use 220.00 |
| "Condition must be A, B, or C" | Using different grading | Map your grades to A/B/C |
| "Year out of range" | Year before 1970 or after current year | Correct the year |
| "Missing required field" | Part name, condition, or price is blank | Fill in all required fields |
Top questions from Australian wrecking yard owners about WreckMate.
Frequently Asked Questions
Real questions from Australian wrecking yard owners, answered plainly.
Getting started
Do I need to install anything?
No. WreckMate runs entirely in your web browser — Chrome, Firefox, Edge, or Safari. No installation, no server, no IT setup. It also works on tablets and mobile phones, so your team on the yard floor can use it without coming to the office. You can optionally "install" it to your home screen as an app — look for the install prompt in your browser.
How long does it take to get up and running?
Most yards are operational within a day. The Quick Start guide walks you through the five essential steps in about 20 minutes. Getting your full inventory across takes longer — it depends on how much stock you have. Using the CSV import, a yard with a few thousand parts can be fully migrated in an afternoon.
We're still on Hollander. Is migration easy?
WreckMate has a dedicated migration tool built for Hollander (Pinnacle Professional). It brings your vehicle and parts data across, and preserved stock numbers stay searchable. Contact us and we'll walk you through it.
Can I try WreckMate before paying?
Yes. Every new yard gets a 60-day free trial with full Pro-level access. No credit card required to start. If you decide not to continue, you stop and owe nothing.
Inventory and parts
What happens if we enter the wrong vehicle details?
You can edit most vehicle details after registration. If you've registered a donor against the wrong acquisition or with the wrong identity and parts are already linked, contact support — we can correct it for you.
Can two parts have the same SKU?
No. SKUs are unique per yard — the sequential number ensures no two parts ever share a SKU at your yard. Across the network, SKUs are globally unique because they're prefixed with your yard code. Once a label is printed, the SKU never changes.
What if a part doesn't have an OEM number?
OEM numbers are optional for most purposes — you can price and sell parts without them. However, you'll want them if:
- You list on eBay (strongly recommended for search visibility)
- You want parts to appear in OEM-number searches by other yards in the network
- You want the best cross-compatibility matching in Parts Search
For parts where you can't find the OEM number, ask your dismantling team to photograph the number on the part before removal.
We have parts with no donor vehicle — how do we import those?
Include make, model, and year in your CSV and leave the VIN blank. WreckMate creates a donor record for that make/model/year combination, which you can flesh out later.
What about new and aftermarket parts we buy in bulk?
That's Shelf Stock — a separate area for quantity-based lines (filters, batteries, globes, reconditioned units) with reorder points, supplier links and purchase-order receiving. See Shelf Stock.
Sales and invoicing
Do our invoices have to include GST?
Yes, if your yard is registered for GST. WreckMate always applies 10% GST and shows it itemised on every quote and invoice. You can't turn this off — it's a legal requirement for GST-registered businesses.
A customer wants to return a part. How do we handle it?
Use Returns & Warranty in the left menu. Raise a Return Authorisation (RA) against the original sale, and work it through Requested → Approved → Received → Inspected → Resolved, optionally restocking the part and issuing a credit. See Returns & Warranty.
Can we do partial payment / deposits?
Yes — Deposit is one of the sale types on a quote, alongside Cash, Charge, COD, Afterpay, Zip and Capricorn. Partial payments are recorded against the quote, and Money & A/R tracks what's outstanding.
Can a customer have an account with a credit limit?
Yes. Trade customers can be given a credit limit (or "no credit") on their customer record, and their outstanding balance is tracked from the ledger of invoices and payments. Aged balances appear under Money & A/R → A/R & Statements, where you can also generate monthly statements.
eBay integration
Do we need a separate eBay account?
Yes — you connect your own eBay seller account. eBay also requires a paid seller subscription (an eBay Pro Basic plan, roughly $24.95/month paid to eBay) for third-party listing tools like WreckMate.
What happens in WreckMate when a part sells on eBay?
The part is marked sold in WreckMate and removed from available inventory, parts search, and the network — automatically, so you can't double-sell it. If you sell a listed part over the counter first, the eBay listing is ended for you.
How do we go from the eBay sandbox (test) to live?
It's self-service: Settings → Integrations → eBay → Configure has a "Ready to go live?" checklist (policies set, a test listing created, webhook verified, template selected) and a Switch to production button. Switching disconnects the sandbox account; you then reconnect with your live eBay account.
Pricing and billing
What happens after our 60-day trial ends?
You'll be prompted to choose a plan (Core or Pro) and enter payment details. If you don't, there's a short grace period — and we'll be in touch before anything is restricted. Your data is never deleted for a lapsed payment.
What's the difference between Core and Pro?
Core covers day-to-day yard operations — inventory, sales, dispatch basics, network search, fitment, and SMS notifications through your own Twilio account. Pro adds the integrations and power features: eBay, MYOB/Xero, the full Work Order Manager, advanced reporting and the website widget. Prices are on the introduction page and in Settings → Account → Billing.
Do multiple yards get a discount?
Yes — multi-yard groups attract a group discount, and the referral program gives you money off when a yard you refer signs up. Your referral code is under Settings → Account → Billing.
Network and privacy
Can other yards see our prices and stock?
If you've opted in to the network, your priced, available parts are visible to other WreckMate yards — part name, vehicle, condition, price, and your yard name. They also see the intake notes on a listed part (when it's a single unit). They never see your acquisition costs, margins, customer names, or sales history. You can also hide specific yards from your own results, and blocking works both ways.
Can our customers search our stock directly?
With the Website Widget (Pro), your live stock can appear on your own website. The inter-yard network itself is yard-to-yard only — your sales staff search it on behalf of customers.
How is our data stored? Is it secure?
WreckMate is hosted on Australian infrastructure, with daily backups and encrypted connections. We don't sell your data to third parties. For full details, see the Privacy Policy on the WreckMate website.
Technical
What happens if the internet goes down?
WreckMate requires an internet connection. We recommend a 4G/5G mobile backup for your main office — a cheap SIM-only plan provides redundancy during NBN outages.
Does WreckMate work on mobile?
Yes. WreckMate is a Progressive Web App (PWA) — it works in the mobile browser on any iPhone or Android device, and can be added to the home screen like an app. For staff on the yard floor, a cheap Android tablet on a 4G plan works well.
Can we have multiple yards on one account?
Yes. Yards can be grouped, and your login can belong to several yards — switch between them with the My yards button in the header. Multi-yard groups also attract a billing discount.
How do we raise a support request?
Open the Help (?) menu in the app for the help guide and feature requests, or email support@wreckmate.com.au. Include as much detail as possible — screenshots help. Response time is typically within a few hours during business hours (AEST).